
Why Install a Double Layer Inflation System for your Greenhouse
There are plenty of modifications and features available for greenhouses, high tunnels, and hoop houses. As the decisions are being made what features are going to have the largest impact per dollar, a double layer inflation system should be considered.
Greenhouse plastic on its own has very little insulation value, however, inflating the air in between two layers of greenhouse plastic will provide additional insulation and improve a structures ability to retain temperatures through cold nights. In addition to better insulating the greenhouse, a double layer inflation system has real structural benefits, as it helps absorb strong winds and sheds snow during snow events.
The short video below provides some visual details to go along with the description in bold above:
If having a better insulated greenhouse or high tunnel sounds appealing to you there are a few things you need to take into consideration.
For those with a structure already built, don't worry you can still work an inflated double layer into your upgrade plans. Don't worry, it isn't too difficult to install on already installed structures.
It is equally as easy to plan this component into an upcoming build; all it will take is know what components and greenhouse plastic are necessary to make it happen.
Below we walk through what you should consider when installing this type of set up for your structure.
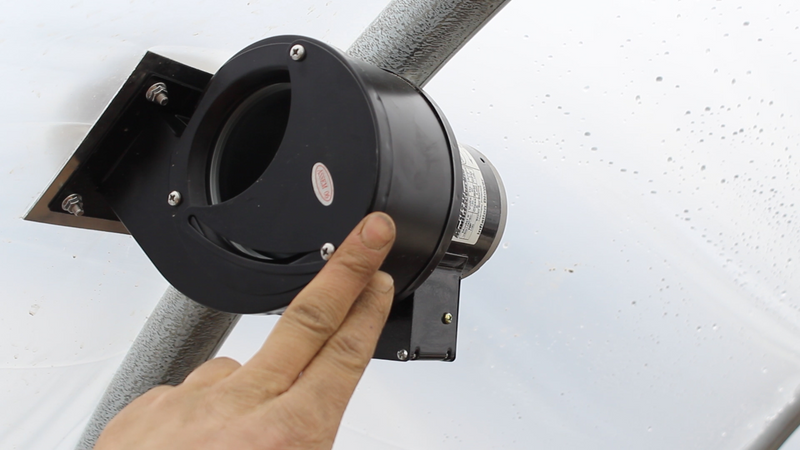
The Type of Inflation Blower Fan for The Size of Your Greenhouse
Whether your greenhouse is 300 sq. ft. or 3,000 sq. ft. you can configure your structure to reap the benefits of inflated greenhouse plastic. When trying to decide what type of inflation fan would work with your greenhouse or hoop house you should pay close attention to two things:
- How many CFM is the fan rated for
- Does the Inflation fan come with a damper
CFM (Cubic ft. Per Minute) Requirements
Inflation fans usually come with a CFM rating. CFM stands for Cubic Feet per Minute and it relates to how strong your greenhouse plastic inflation fan is.
If you have a smaller greenhouse you would want an inflation blower fan with a lower number of CFM, and if you have a larger structure you want to use an inflation blower fan with a larger CFM rating.
In addition to the CFM ratings of the fan, it is often very helpful to have a damper for this piece of hardware.
A damper is an item attached to the blower fan that will allow you to very easily regulate the amount of air being blown in between your layers of greenhouse plastic.
As you might expect, having a damper on your blower fan provides a bit of forgiveness if you purchase a fan with a little bit more power than you want. Simply adjust the damper so it blows less air between your layers.
The most standard Inflation blower fans with dampers come standard with a 60 CFM rating and a 148 CFM rating. If your structure square footage of top cover is 2,400 square ft. or less you can confidently employ the use of a 60 CFM rated blower fan, and if your top cover is greater than 2,400 square ft. a 148 CFM rated fan would be more ideal.
How is My Greenhouse Plastic Secured
This is an internal question you will need to answer in order to figure out whether you need to make any additional changes to your structure configuration.
Most likely, you are fine, and all you need is the blower fan and a second layer of greenhouse plastic to complete your double layer inflated system. If this describes you, go ahead and skip this section to get to the plastic and blower fan specifics.
You should check that your structures' greenhouse plastic attachment method is up to the task of holding the plastic when it is being inflated since outward force will be applied to your plastic in the form of air pressure.
It is important to make sure that the hardware installed on your greenhouse is
- Firmly installed AND
- That your greenhouse plastic is evenly held (so pressure from the fan is dispersed evenly)
If you are interested in an improved greenhouse plastic attachment method the best greenhouse plastic attachment hardware on the market is Spring Wire Channel and Spring Wire.
This type of attachment method keeps your plastic firmly in place, and it can easily hold the two layers of greenhouse plastic you will need to install. If you are unfamiliar with this type of attachment method, below is a brief video outlining how it works.
You can also purchase Spring Wire Lock Channel and Spring Wire here if you think this is what you want to use with your greenhouse.
Spring wire channel and spring wire do a great job of holding plastic, shade cloth, insect net, etc, and more importantly for the purpose of this post, it works perfectly for an inflated system because the Spring Wire does a fantastic job of pushing the plastic layers together where they join, which will help create a seal to keep the air in between layers.
What type of plastic goes on as a first layer vs a second layer
Once you have made sure your greenhouse plastic attachment method is all set you can now consider what type of plastic is ideal for a bottom layer and which type of plastic is ideal as a top layer.
First, use a strong plastic. It doesn't need to be a 12 mil string reinforced plastic or anything over the top like that BUT I would strongly recommend a minimum 6 mil UVA Clear greenhouse plastic. If you use a 3 mil, 4 mil, or 5 mil greenhouse plastic it may inflate for a while, but it will breakdown faster, and since installing a double layer system takes a little more installation effort and time it would make sense that you want to prolong the time between replacements if you can. Now that I have stated this here is the rundown on my thoughts on the type of plastic coverings that are ideal for a bottom and top layer in a greenhouse inflation system:
6 mil Clear Bottom Layer AND 6 mil Clear Top Layer (same type of plastic for both layers)
If price point is your main concern, you could install two standard 6 mil UVA Clear greenhouse plastic covers for both layers. These typically last 4 years if installed correctly on a metal framed structure, and these are the most affordable 6 mil greenhouse plastic options available. This plastic is made for exposure to sun and it can last even longer than the 4 years I mention above; just make sure it is installed using a secure attachment method and it will last a long time. That said, this plastic doesn't have any additives that specifically aid in reducing the interior condensation (dripping on plants), or increased thermicity (even more heat retention); the below set-up covers that.
6 mil IRAD Bottom Layer AND 6 mil UVA Clear Top Layer
If you are looking for a little more functionality to the double layer plastic set-up using 6 mil IRAD (infrared anti-drip)greenhouse plastic will do a lot for reducing the amount of droplets that drip on your plants inside your greenhouse. This type of plastic also has an increased thermicity, which does help retain a little more heat than its standard UVA Clear 6 mil counterpart. With this type of plastic on the inside of the structure, plants will not only benefit from the double layer inflation system, but they will benefit from the improved quality of the interior layer of plastic since less water dripping on plants will mean a lower potential instance of mold, disease, pests, etc.
The 6 mil IRAD greenhouse plastic also is rated to last 4 years, although if you install it correctly on a metal frame it could last a year or two longer.
If you do the IRAD plastic as the interior layer the outer layer can still be the 6 mil UVA Clear greenhouse plastic. This outer layer would just be providing the second barrier so a dead airspace can be created with the blower fan...no need for IRAD plastic on the outer layer.
9 mil Woven Clear Bottom Layer AND 6 mil UVA Clear Top Layer
Some people want a greenhouse plastic with a higher diffusion rate. If that is the case you can consider a 9 mil woven polyweave greenhouse plastic. These have a slightly lower light transmission rate, but a higher percentage of the light that passes through does so in a diffused manner. In simple terms diffused light will be able to reach more leaves in a tightly planted greenhouse. If a diffused plastic is your thing 9 mil woven greenhouse plastic works great as the bottom layer of plastic. It is strong, and diffuses the plastic beautifully.
Although the 9 mil woven plastic would make a great first layer of plastic it shouldn't be used as the outer layer of plastic, as it is heavier than 6 mil plastic and will either put too much stress on your blower fan, or will not inflate well due to its weight. For this reason, if you install a 10 mil woven plastic as your interior layer of plastic we recommend using a standard 4 year 6 mil UVA Clear greenhouse plastic as your exterior layer.
If you are planning to purchase a structure be sure to ask about the pricing needed to add a second layer of greenhouse plastic and an inflation fan. If you are planning to fabricate / DIY your own structure it is still worth considering a double layer set-up.
Regardless which type of set-up you move forward with, or what type of structure you are adding an additional layer of plastic to, the goal should be to provide a better atmosphere for your plants to grow, and while a little time and investment is needed to apply this set-up to your structure the payback period for an inflated greenhouse system is what makes these components and features so popular among market gardeners and farmers