
Everything you NEED in order to ADD Roll-Up Sides to your Greenhouse
 We manufacture and sell our own DIY High Tunnel and Greenhouse Kits but one of the most common questions we get is: How to add roll-up sides to an existing structure. In this blog, we're going to cover everything needed when adding roll-up sides to an EXISTING high tunnel, greenhouse, or hoop house.
Roll-up sides are great for passive ventilation, but trying to figure out all the pieces and parts you need to add them as a retro-fit to your existing structure, can be intimidating.
We're going to walk through everything you'll need to consider for this project step by step from how your current structure might need to be modified to accomodate roll-up sides to what materials are needed.
Materials Needed for Roll-Up Sides
- Hiprail
- Baseboard
- Roll Bar
- Plastic
- Operators
- Anti-Billow Rope + Hardware
- OPTIONAL: Corner Wind Panels
Now that we've covered the materials required to install roll-up sides let's go over the step by step install process.
Installing Roll-Up Sides on your Existing Structure
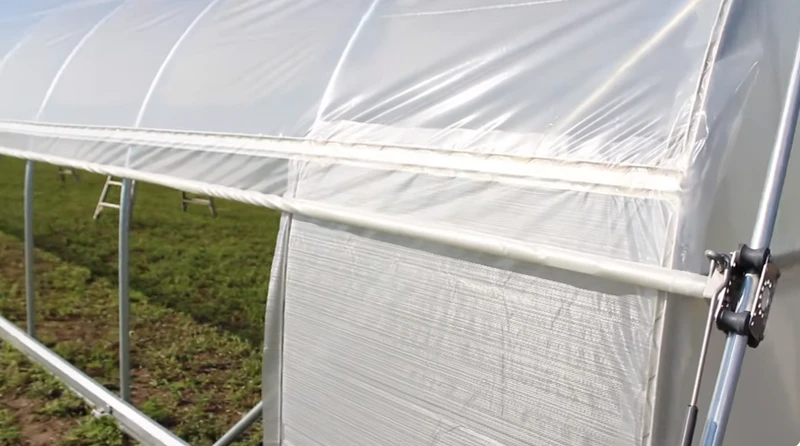
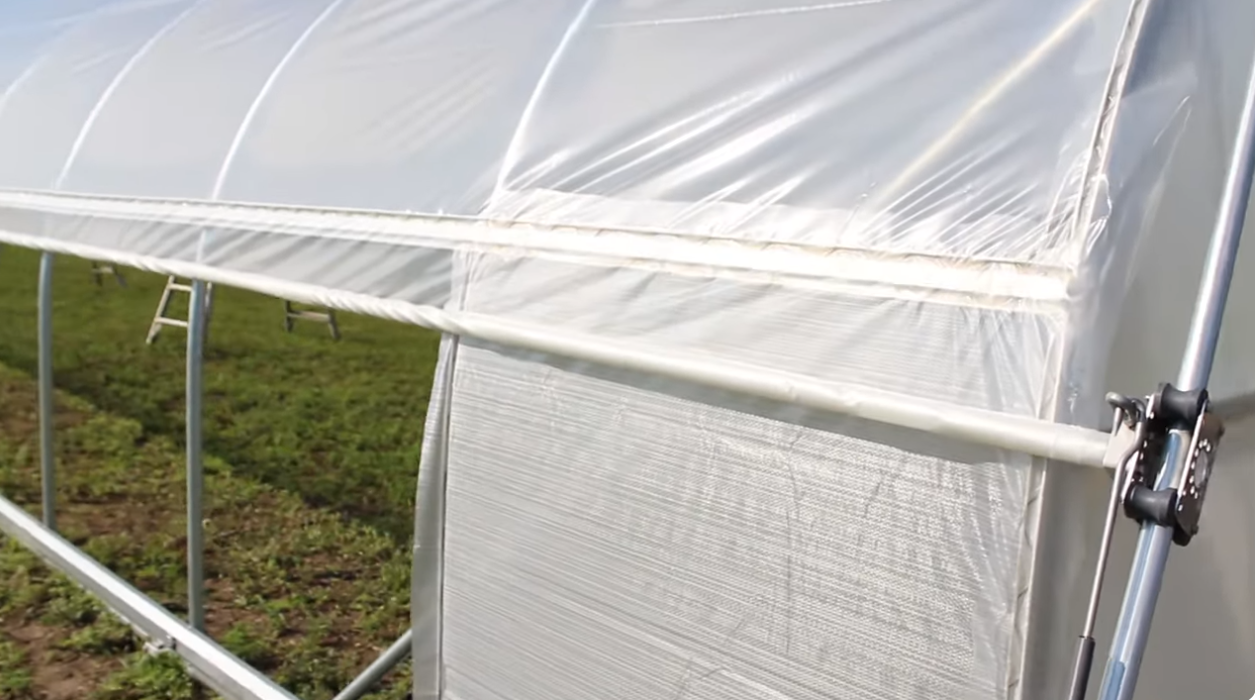
Step 1 - Install a Hip-Rail on your Structure
You will need to make sure you have a hip-rail on your structure. It doesn't have to be the double channel hip-rail we sell, it could be lumber, but you will need a hip-rail BECAUSE a hip-rail is where your roll-up sides will drop off from.
If you do not have a hip-rail and try to install roll-up sides, you might successfully install the roll-up sides BUT you will struggle to install an anti-billow rope system and you will be at a much higher risk of experiencing damage to your plastic top cover because you will now have the weight of the roll-bar hanging on your plastic without being supported.
What could you make a hip-rail out of?
We sell double channel, which we think is the best option. However, you can also install lumber for your hip-rail and then attach the less costly single channel that we offer, directly to the lumber on the exterior face. If you go with lumber, the type of lumber is up to you, but 2x6 are commonly used.
Step 2 - Installing Baseboard on your Structure
You will want to confirm that your existing structure has a baseboard. You will absolutely need a baseboard so that your roll-up sides can rest on something that is not the ground. Baseboards are also what your anti-billow hardware will attach to (which we will cover in a later step)
What could you make a Baseboard out of?
This can be installed with the steel baseboard/hat channel, like the ones we sell with our high tunnel kits. Hwowever, you can also install material that you've sourced locally like lumber or plastic.
Step 3 - Figure out the length of your structure
Take a tape measure, have one person hold it on one end, and walk to the other, and get a precise measurement. Whatever number you get, add at least 12 inches to it. This is the minimum length you need to most easily install your roll-bar. If you are doing roll-up sides on BOTH sides of your structure, you will need two roll-bars at this length.
The reason you will want to add 12" to the roll bar measurement is so that extends just past your structure on each end. This will keep the roll-bar against your structure's bows while it operates.
This roll-bar will be the MAIN component of your roll-up sides.
What could you make a Roll-Bar out of? Where can you source one?
We recommend getting a quote from us for our 1 3/8" Outer Diameter Steel Tube roll bars. Alternatively, because the shipping cost can be prohibitive, this material can be sourced as chain link top rail fencing tube at a local hardware store. This material might also be referred to as 1.315" OD Steel Tubing.
Most hardware stores with chainlink fence material usually sell 1-3/8" OD steel tubing in 10 ft. 6 in. pieces. One end is swaged (male) and the other end is un-swaged (female), which allows you to "daisy-chain" the roll-bar the full length of the structure, connecting them by inserting the male end into the female end and attaching with self tapping pan head tek screws.
1-3/8" OD tubing is going to be the most compatible roll-bar for most operators across the industry - this is not just referring to the roll-up side operators we sell at Tunnel Vision Hoops, this is a standard diameter of tubing used across the entire industry.
Step 5 - Decide on Roll-Up side Operators
These are the mechanisms that will actually be used to roll your sides up and down. There are various roll-up side operators to choose from, and if you want a deep dive on the various types, we actually have a separate video on the top four different roll-up side operator options.
What Operator options are available?
Essentially, there are roll-up operator options ranging from simple budget friendly manual operators, to manual gearbox operators with internal brakes in the mid-price range, to automated roll-up side options that can be installed for relatively simple operation all the way up to extremely dialed in with various other ventilation components on your structure.
- Simple Handles - Budget Operator #1
- Universal Joint Handles - Budget Operator #2
- 7:1 Gearbox - Recommended for structures shorter than 48 ft. long
- 13:1 Gearbox - Recommended for structrures longer than 48 ft. long
- VCU2-24 - Auto Roll-Up Operator
- AegisTec - Auto Roll-Up Operator with additional overrides like wind, rain, humidity
- AegisTec+ - Same features as AegisTec with remote wifi access capabilities
Step 6 - Determine if you want to install Corner Wind Panels
Corner Wind Panels are technically optional, but they do help prevent winds from shooting behind the roll-up sides in heavy winds.
How to measure for Corner Wind Panels?
If you do want Corner Wind Panels, you will need to measure the distance from your endbow to the first bow in your structure. Once you've gotten that measurement you will ned to measure the distance from your ground/baseboard to your hiprail (or the height where your future hiprail will be installed).
Additional material required for corner wind panels?
If you do want to add corner wind panels, you'll need to plan to purchase the single channel needed on the next bow from your ends so that you can wire in the small plastic panel.
Step 7 - Determine if you need addtional Plastic for Roll-Up Sides
While we're talking about plastic, you'll need a plan for what plastic you'll use on the roll-up sides. If you are going to re-cover your entire structure, you can just make sure the plastic goes over the entire structure, reaching the ground on each side, with excess, and you'll be able to fasten this material to your hip-rails, and attach your roll-bar to the excess that rests on the ground.
You can check out a full video from our YouTube channel that goes over how to measure for a new top cover.
If you do NOT need a completely new top cover, and you only want plastic for your roll-up side, let's say because your top cover is still in good shape from the hip-rail on one side to the hip-rail on the other side... you would just need to measure the distance from the ground to your hip-rail, and add 2 ft. to whatever number you get. This can be considered your minimum width of material for your roll-up, and then your length of needed material will be the length of your structure plus at least 2 ft.
For example, if your distance to the hiprail is 6 ft. and the length of your structure is 48 ft. The smallest piece you should consider for that side of the structure would be 8 ft. wide x 50 ft. long. That is just for the one side. You would need two of those if your other side were identical.
Keep in mind that most plastics often come in set widths so you might need to bump up to the next available width, but this gives you a basis for knowing the minimum size plastic you would need for your sides.
If you didn't want to round up to standard widths, or you just need a custom cut plastic piece to a specific width and length, we do offer custom cut woven greenhouse plastics that can be used on roll-up sides. The benefit of these woven covers are that we can have them manufactured at any width and length as long as they are in increments of 1 ft. If you need some custom plastic for your sidewalls you can check out the woven plastic I reference at this QR code, or the link in the description
Step 8 - Determine Anti-Billow Hardware needed for your Structure
Next, you're going to need material for your Anti-billow system. This is the system that is going to prevent your roll-up sides from clanging around in the wind. Typically, these are made of attachment hardware and 1/4" polyester rope.
At Tunnel Vision Hoops, we like to use EZ Snap Hooks with bolts and lock-nuts, and 1/4" polyester rope for our attachment hardware. You can also use eye-bolts as your attachment hardware if you have lumber hiprail or baseboards.
Whatever attachement hardware you choose, our one suggestion would be, make sure these are installed with both bolts AND nuts. We do not recommend using screws ONLY becasue they have a much higher likelihood of being pulled right out of your baseboard and hiprial in strong winds.
Once your hardware is compomised, the entire anti-billow system is compromised so it is important to make sure you purchase the correct hardware for the safety and longevity of your newly installed roll-up sides.
If you want even more detail on how to run anti-billow rope, count out how much hardware you need, and more, feel free to check out this video from our YouTube channel.
If you follow these steps you now have a plan of attack for roll-up side material, where to source that material, what operators you could use, and how to secure the roll-up sides with anti-billow rope.
Hopefully this post helps you retrofit your existing structure to include the roll-up sides of your dreams.
If you need any of the materials outlined in this video, or want a full package DIY Kit that comes with roll-up sides, feel free to reach out to us at 833-886-6351 or by emailing info@tunnelvisionhoops.com.