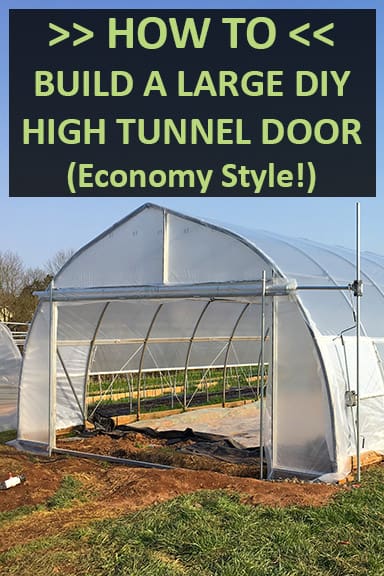
Building a Large DIY Door for your High Tunnel | Greenhouse Entrances
There are endless entrance options for your high tunnel, hoop house, or greenhouse. To choose a door best for you means you will need to choose a door that balances your budget and your needs. Often times, those needs include being able to drive equipment into the high tunnel or wanting to use the door as a way of ventilating the structure. This requires a large entrance. For those of us wanting high tunnel doors that are larger than 10 ft. wide it can be very costly unless we get creative. In this post, we go through the step by step process for how you can use greenhouse plastic, roll-up hardware, and round steel tubing to make a door that can open nearly your entire end-wall.
We are going to go through all of the material and steps required to create your very own large end-wall opening.
Overview of Parts Required
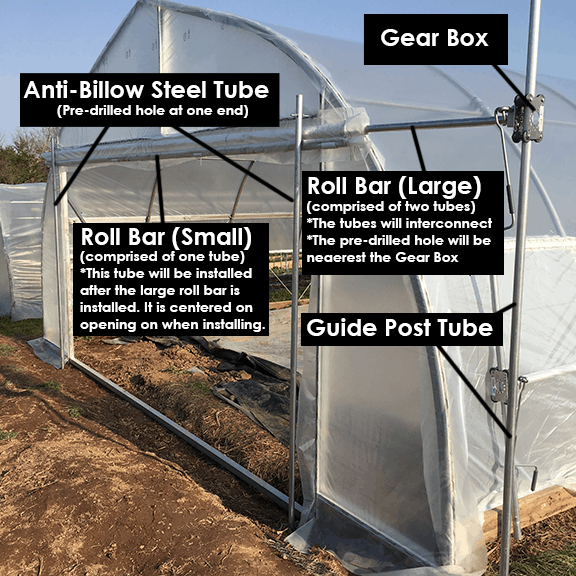
The picture below provides a good snap shot of what your economy roll-up end-wall entrance will look like, and the different parts and components that are required to build your end-wall entrance.
We show the door in its various stages from start to finish further down in this post, but here is a run down of the materials needed to create a large end-wall roll-up door. The list below assumes you already have end-wall framing:
- Heavy Duty Woven Greenhouse Plastic
- Gear Box and Crank Handle
- Spring Wire Channel
- Snap Clamps (1.315" OD)
- Spring Wire
- Guide Pipe (1.315" OD)
- Roll-bars (1.315" OD)
- Anti-Billow Tubing
- Threaded Rod and Nuts and Bolts
Now that we have covered the main building components for this type of door, let's go through the process of planning and executing the installation of the door.
Framing The Door Size you Want
The first part of any door installation is determining what size you want your entrance opening to be when all is said and done. Simply put, how wide and tall do you want your entrance to be AFTER installation is complete, and how will you frame your end-wall to create that entrance opening.
For personnel doors and sliding doors there is often a slight difference between the door size and what your rough opening requirements need to be. For example, a person door that is 36 inches wide may require a rough opening width of 36.5 inches wide. This may seem like a small detail, but that is not the case when you go to put your door into the rough opening.
RELATED: Best Shade Cloth for Tomato Production | Your Yield is Your Profit
For these large DIY door openings your rough opening will likely need to be 6 inches wider than the actual entrance opening you require. This is due to the anti-billow tubes that are on the left and right of this type of door. These are offset 3 inches in from your entrance studs in order to allow the entrance plastic covering to fasten with Spring Wire when the door is not in use. This will be more evident further on in this post.
Figure Out How Large an Entrance you Want
For large entrance openings you need to figure out how large a door you can install. This will in-part be dictated by how tall your door is since the height of your structure closer to the sides is limiting. That is to say, you may find that the widest you can make your door while maintaining an 8 ft. tall opening is 14 ft. wide. Once you have an idea of the maximum height of door you can fit and maintain for an adequate desired width, you are ready to move forward with the next big door framing step.
Make Sure Your Opening Has Enough Support
For wider and taller high tunnels you will find that you don't have any real limits as to how wide a entrance your structure can include. For example, a 30 ft. wide high tunnel with 8 ft. sidewalls would be able to easily fit an 8 ft. tall door for the full 30 ft. width of the structure. While this seems great in theory, I would strongly recommend having a support or two in your door framing in order to better support the end-wall, and to prevent any future billowing of your large economy roll-up door. Fort this reason, a slightly smaller door width may be better structurally than an a large door that opens your entire end-wall.

If you do want to make your end-wall door as large as possible, however, you may want to consider some additional supports throughout its full width. For example, if your plan is to have a 20 ft. wide door, it would be good to consider having a support stud in the middle of your entrance opening. This would essentially split your large end-wall door into two separate 10 ft. wide openings that open as a part of the same large end-wall door.
Now that we have covered some basic framing considerations lets go through the step-by-step process for making a large DIY door for your high tunnel or greenhouse.
Step-by-Step High Tunnel Door Installation Process
Below are pictures of each of the main steps of the installation process for a large DIY High Tunnel Door.
Step 1
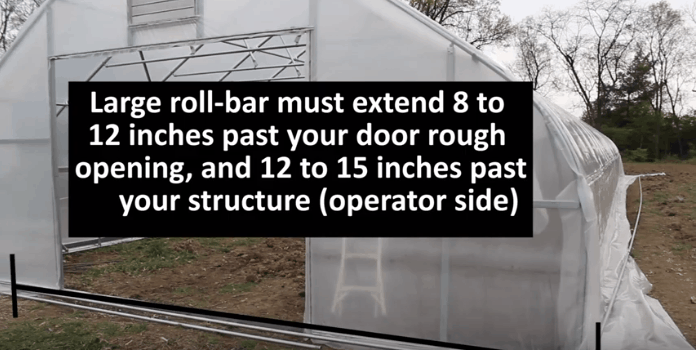
If you ever install a large end-wall roll-up door on your structure you will need a large roll-up bar that can cover the entire front opening you have framed for. For the purposes of our DIY door you will want the longest roll-bar to extend 12 to 15 inches past the side of the structure as shown below.
Step 2
The above picture shows the gearbox operator resting near the large roll-up bar. This will be the side of the structure the large roll-up bar is operated from. Once the gearbox is attached to the end of the roll-up bar there will eventually be a large guide pipe pounded into the ground for the gearbox to ride up and down on.
Step 3

Above, you can see how the gearbox attaches to the end of your roll-up bar. An adapter will slide into the end of your roll-bar, and will be attached with a bolt and lock-nut. Then, the gearbox slides onto the end of the gearbox adapter, where a washer and bolt fasten the gearbox more permanently to the end of the roll-up adapter.
Step 4
The above picture demonstrates what the long roll-up bar you are assembling will do when in operation. The picture also displays a second roll-up bar (circled above) that is a part of your door operation. This smaller roll-up bar grabs a hold of the doors' plastic covering right near the bottom of the plastic sheet used to cover your opening.
The smaller roll-bar doesn't actually ever "roll" though. It simply raises, as the middle larger roll-bar does the actual rolling. As the middle larger roll-bar rolls upward it sucks plastic into the roll from the top and bottom, thus drawing the bottom roll-bar upward and raising the door faster.
The smaller roll-bar does need to fasten securely to the plastic door covering, and this is done with Spring Wire Channel and Spring Wire. The Channel is fastened directly to the full length of the small roll-up bar as shown in the following step.
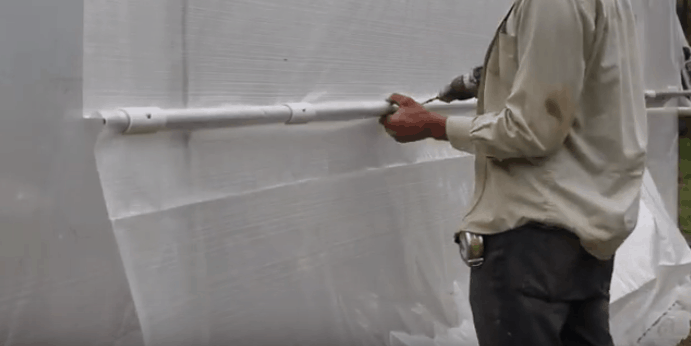
Step 5
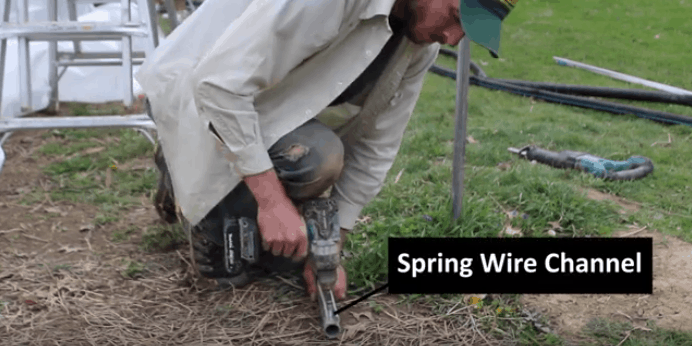
Note how the above Spring Wire Channel lines up with the end of the small roll-up bar. I am driving a self tapping TEK screw through the channel and into the Spring Wire Channel to hold it in place. The screw placement starts one inch in from the end, and then I drive another screw every 10 to 12 inches all the way to the other end of the roll-up bar.
Step 6
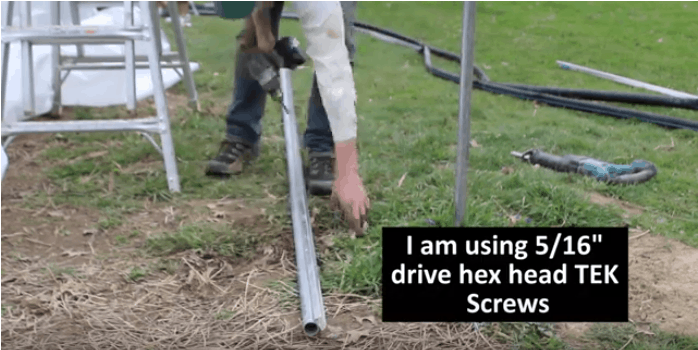
The picture above shows the type of screws best used to attach Spring Wire Channel to the roll-bars. You can see that the Channel itself extends all the way to the opposite end of the small roll-bar.
Step 7
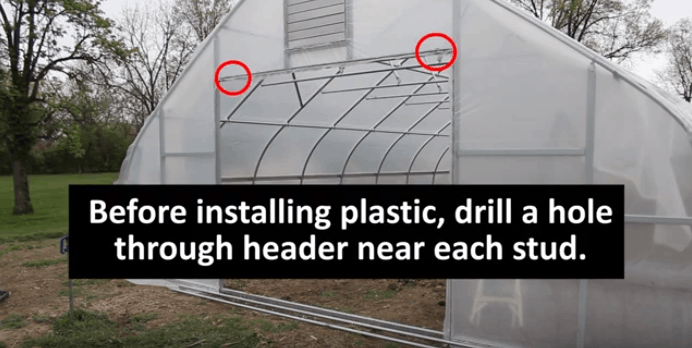
Now that you have assembled your two roll-bars you will need to prepare your framing a bit more before attaching the panel of woven greenhouse plastic. Where the two red circles above are you will need to drill through your header about three inches in from the left and right stud.
Step 8
As you can see above, the hole has been drilled through the channel and the square steel tubing behind it. If the channel was attached to lumber instead of steel you would drill all the way through the lumber as well. These holes are important to drill at this point of your installation because you won't as easily be able to drill through this point in later steps as there will be additional obstructions. These holes will be the location that your anti-billow steel tubing is attached with threaded rods.
Step 9
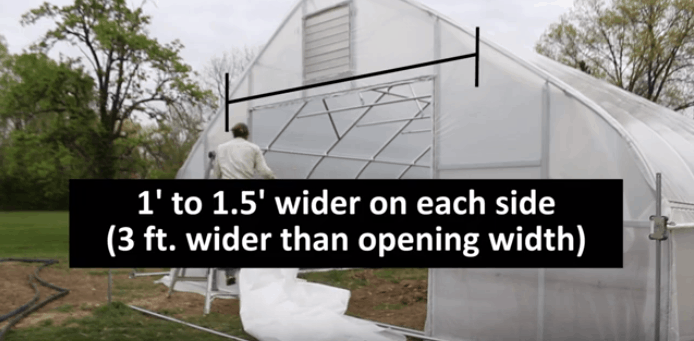
Once your holes are pre-drilled through the door header you are ready to position your plastic cover and secure it in place for the next steps of the installation process. As stated in the picture above, you will want your plastic door cover to be a bit wider and taller than your opening.
Step 10
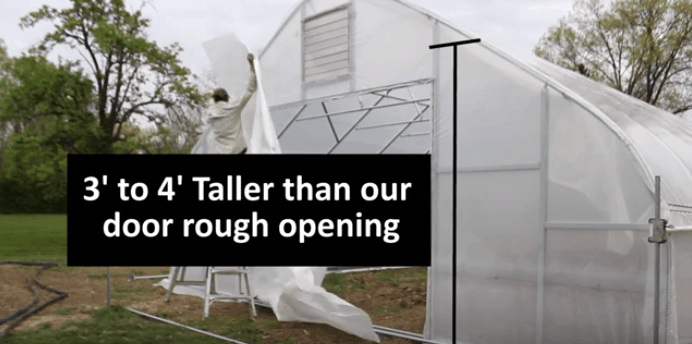
You will also want to make sure your plastic has enough excess through its length where you will be able to have a little extra at the top of your door and at the bottom of your door.
Step 11
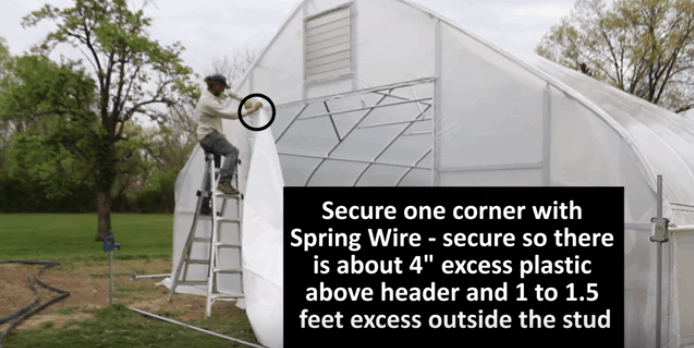
Begin installing your woven greenhouse plastic door covering at a top corner
Step 12
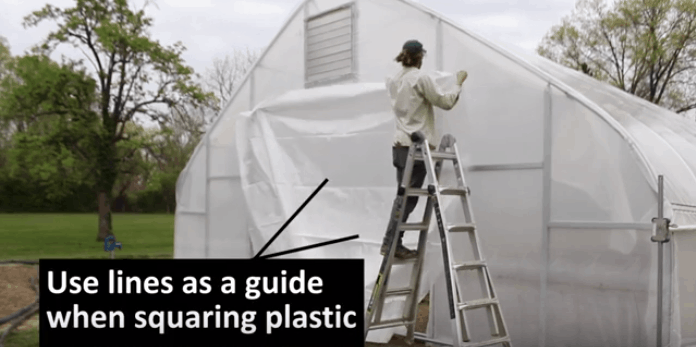
Square your plastic door covering and secure the opposite corner with spring wire.
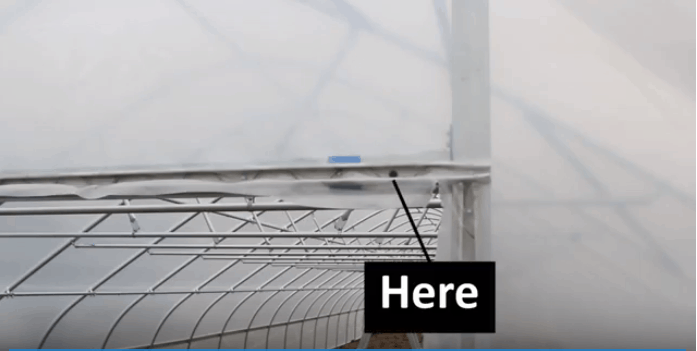
Step 13
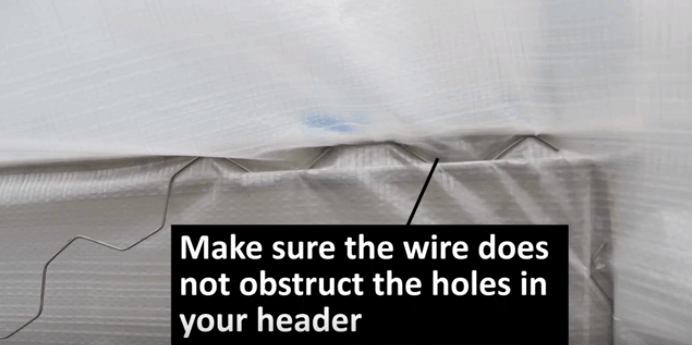
Take note of how the Spring Wire lines up with the location of your previously drilled holes in the header. Your wire should attach your plastic covering without blocking the hole that extends through your door header.
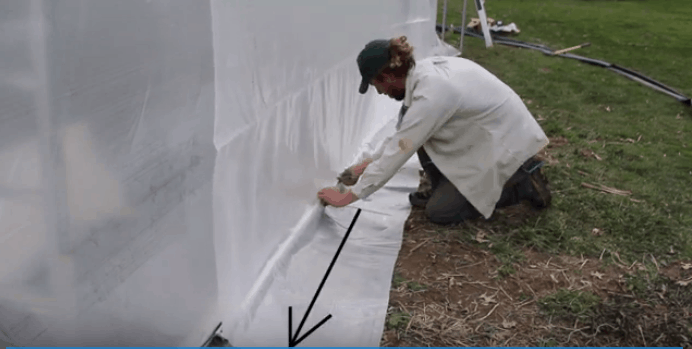
Step 14
Work the spring wire inward toward the center of the door header. Maintain a consistent amount of overhanging plastic on the top of your door header. You can always trim excess plastic off above the door. Usually leaving three to four inches of excess above the door header is sufficient material to work with and for your wire to grab a hold of.
Step 15

Once your plastic is installed and hanging in place, measure from the door header down and make a mark with marker at the half way point of your rough opening. These marks will be a point of reference for later steps.
Step 16
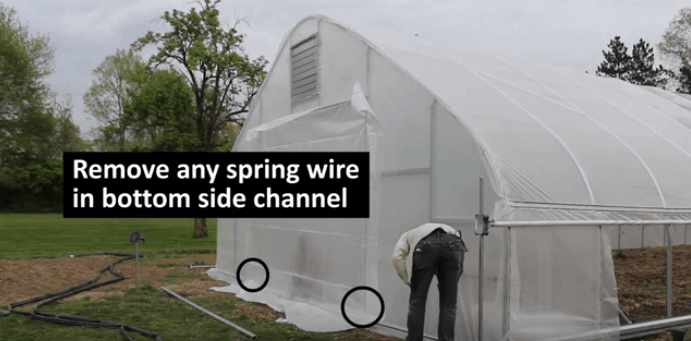
Before you take on the next steps if you had temporarily put any Spring Wire in the stud rough opening members, you will want to remove that Spring Wire so your end-wall door plastic is free-floating. This will allow you to position and attach your roll-up bars to the door plastic to secure it in place.
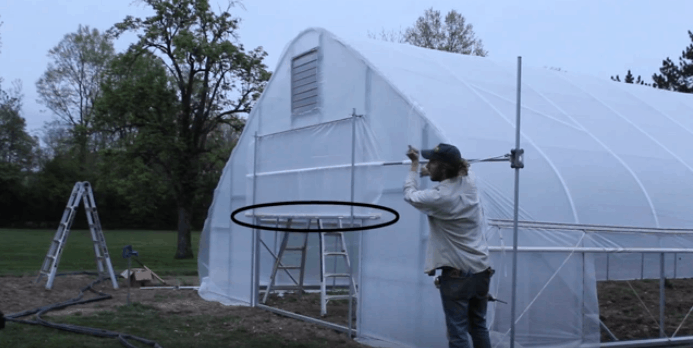
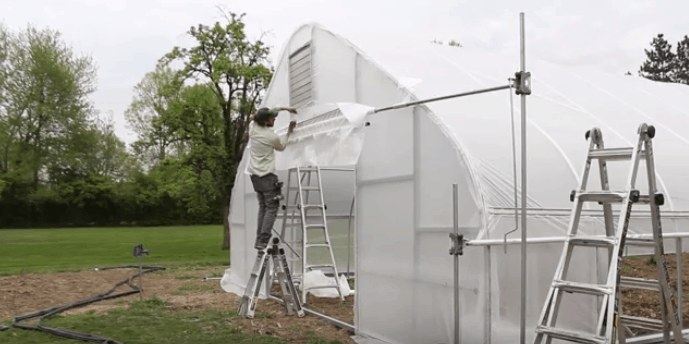
Step 17
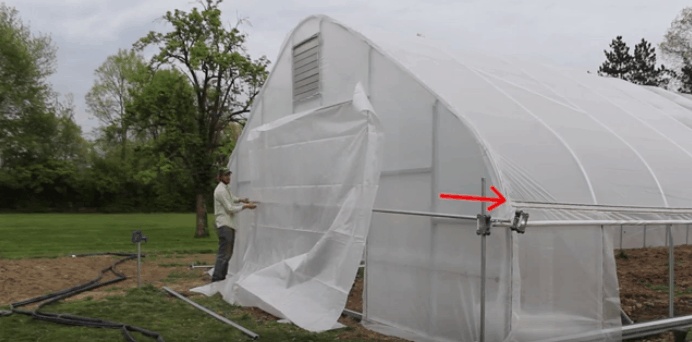
The above picture shows how to begin the roll-up bar placement of your end-wall door. note that the gear-box operator is to the exterior of your structure about 12 to 15 inches, and that the bar is roughly in the middle of your door opening.
RELATED: Best Greenhouse Plastic | Comparing Through First Hand Experience
Please note that while the pictured bar can rest on this structures roll-up side you may not always be able to do this if your roll-up side operators are at the opposite end of your structure OR if your roll-up sides are configured with a guide pope that attaches directly to the structure with an open eye-hook. For the purposes of this installation I was able to rest the end-wall roll-bar directly on top of the roll-up side and use this as a set of extra hands. You may find you require another person to assist you in holding the end-wall roll-up in place.
Step 18
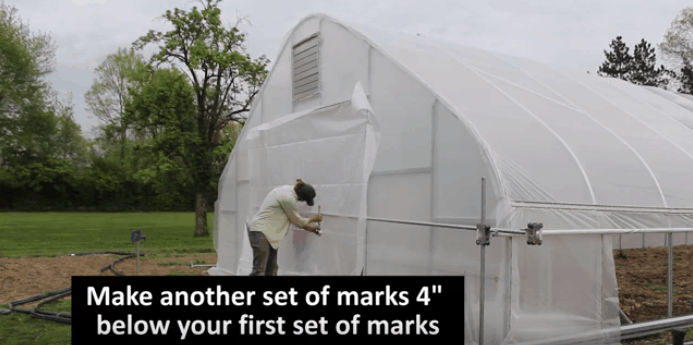
While we made marks in earlier steps along the middle width of your rough opening, we need to make an additional set of marks 4 inches beneath those previously made marks. These new marks will be where you want to attach your longer roll-bar. So, you will have the second group of marks acting as the location for where your bar will attach, and your first group of marks will be where your roll bar should rest before attaching the second smaller roll-bar at the bottom of the plastic panel.
Step 19
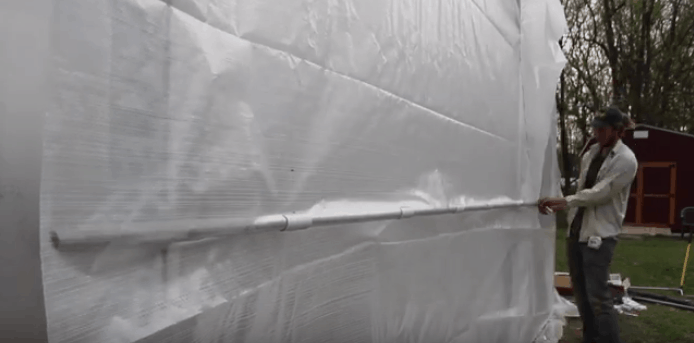
Above you can see that the long roll-bar after Snap Clamps have been pushed over top the plastic and attached to the plastic door panel. Space the snap clamps so they are between 15 to 24 inches apart from one another through the full width of your plastic panel.
Step 20
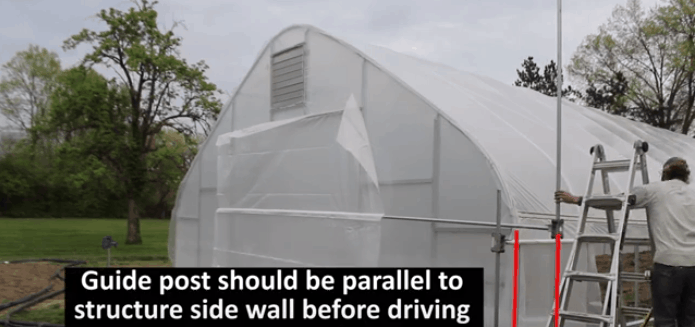
Once your long roll-up bar is attached to the plastic panel, you will need to place your large guide pipe parallel to your structures side-wall. You will push the large guide pipe through the gearbox itself, before pounding the guide pipe into place.
Step 21
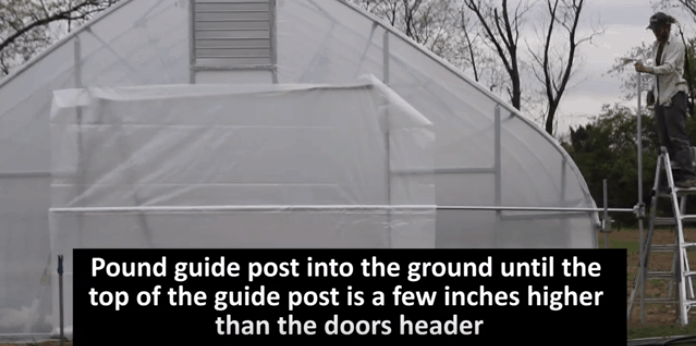
Pound the guide post into the ground until the top of the guide post is a few inches higher than the height of the doors' header. Once this guide post is in place you will be able to move your center / longer roll-bar up and down as necessary for the remaining steps of the process. You will want to roll your long bar up so that the bar is in line with the first group of marks you made in earlier steps. In other words, before you move on to the next steps make sure your long roll-bar is in the middle of your doors rough opening.
Step 22
You are now ready to install the small roll-bar that had the Spring Wire Channel attached on its full length. Before doing this I would recommend trimming some of your excess plastic panel covering beforehand.
Step 23
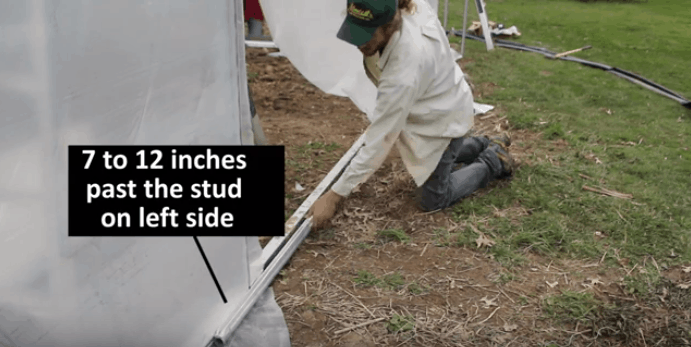
Position the small roll-bar so 7 to 12 inches overlaps your door studs on the left and the right of your rough opening. This will ensure that the bar remains on the exterior of your structure through the life of its operation.
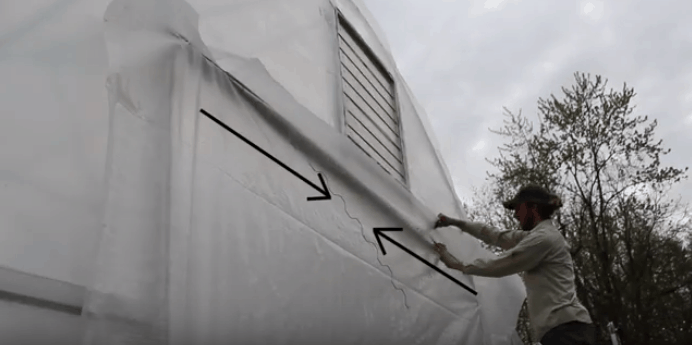
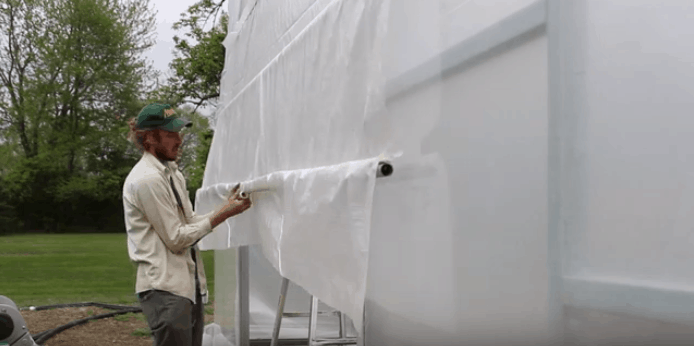
Step 24
Push Spring Wire over top your end-wall plastic panel and into your Channel. Start in the middle of the small roll-up bar, and work your way out in both directions. Use the folds in the plastic as a way of ensuring your small roll-up bar is being installed square.
Step 25
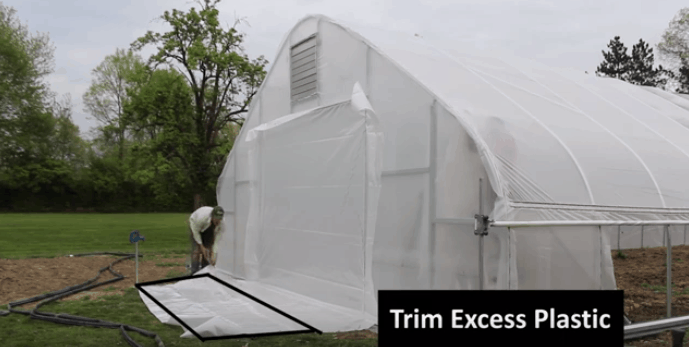
Once your smaller roll-bar is attached with Spring Wire roll up your door so that it is completely open. This will be a test to see how well the bars meet at the top of your structure. Rolling the door up at this point will also allow you to see how the door operates and where you will need to trim the plastic covering.
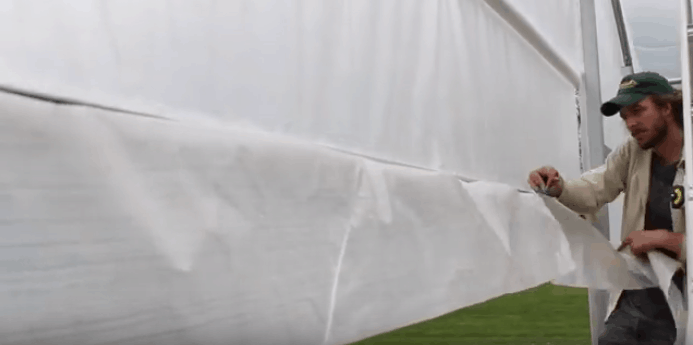
Step 26
As you can see from the picture above, there is excess plastic hanging off of your small roll-bar. I like to attach this excess plastic to the small roll-bar in order to add additional hold to the plastic itself. This will also allow you to cut the excess plastic off your bottom roll-bar in a more consistent / cleaner manner.
Step 27
Here I am above, trimming the excess plastic off the very bottom of the roll-up bar.
Step 28
After I have trimmed the bottom, and I like the way the door is moving up and down, I am going to more permanently connect the snap clamps onto the middle longer roll-up bar. I do this by driving Pan Head self tapping TEK Screws though the snap clamps and into the roll-up bar. These screws will prevent the snap clamps from sliding over time, and will keep the roll-bar on the same point of the plastic opening as intended.
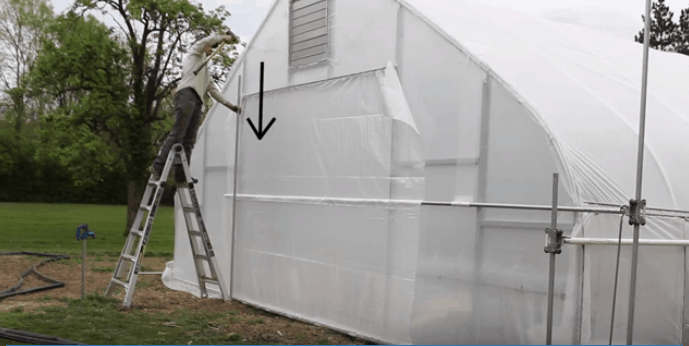
Step 29

The next step will be to install the anti-billow tubing for your end-wall door, as shown in the circled areas of the picture above. The anti-billow tubing prevents winds from moving your door around through windy weather.
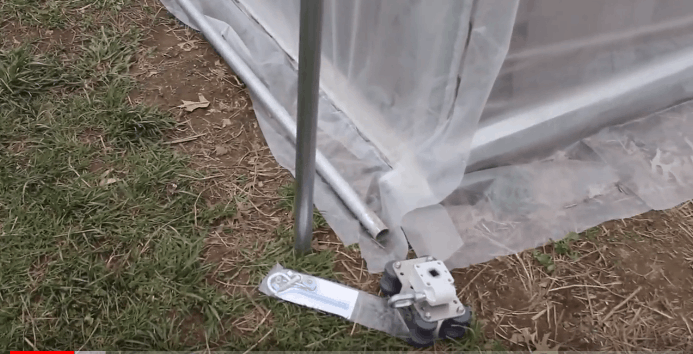
Step 30
The last step for your door installation will be to pound the 1.315" (1 and 3/8") OD anti-billow tubing units into the ground. You will line these tubes up with the holes you drilled in your door header in previous steps. You will want to have pre-drilled these units so there is a hole through the tube about 3" in from its end. This hole will then line up with the hole in your header, and a threaded rod will be able to slide through the header and the anti-billow tubing to hold everything in place.
Step 31
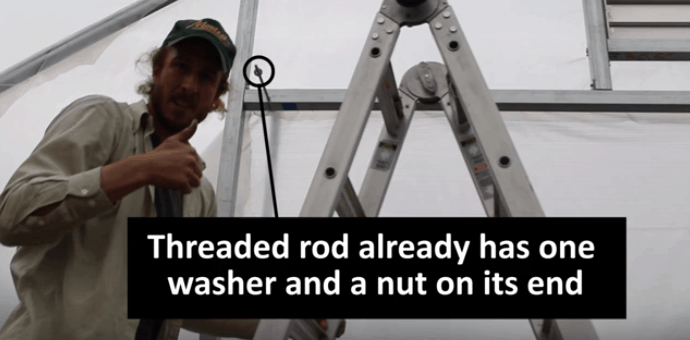
Once your anti-billow tubes have their holes lined up with the holes in your header, push a sharp object through the hole from the interior to puncture the plastic on the exterior. Then, from the interior push a threaded rod through the header and the header hole. I like to preemptively place a washer and a nut on the threaded rod on the interior side to prevent it from being pulled all the way through.
Step 32
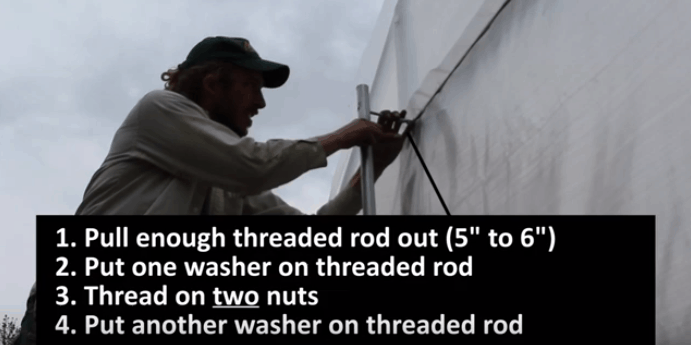
Move back out to the exterior, and grab a hold of the threaded rod you pushed through the door header from the inside of the structure. Pull the excess threaded rod through the hole you have drilled in the anti-billow tubing. You will want to put two washers and nuts on the threaded rod BEFORE pulling the threaded rod through the anti-billow tubing. See the picture below for a closer view on what the threaded rod will look like after all the nuts and washers are in the correct locations.
Step 33
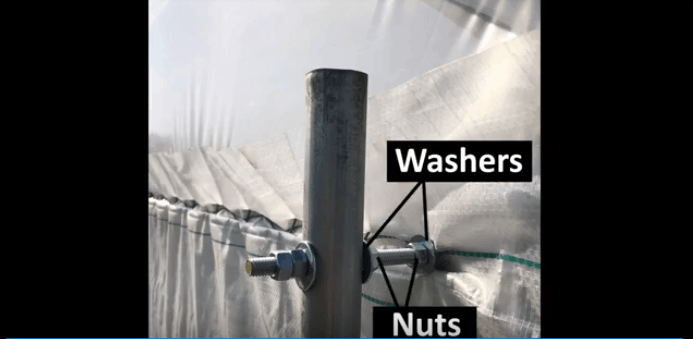
The picture above is intended to provide more detail as to how the nuts and washers are arranged when attaching your threaded rod to the anti-billow tubing. Note that the space between the anti-billow tubing and the header of your door is enough space for the roll-bars to move up and down freely.
Finished DIY High Tunnel Door
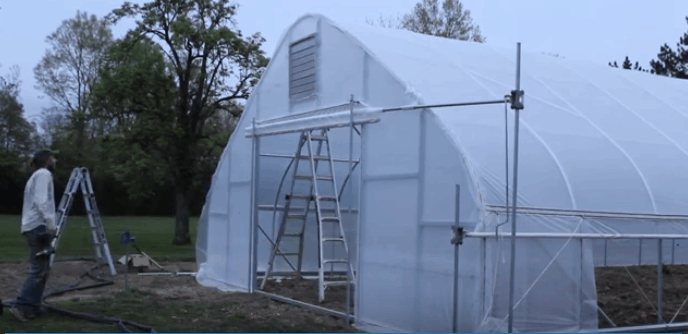
Once your anti-billow tubing has been installed, and you have trimmed your excess plastic covering your roll-up door is now complete. The above picture shows a completed DIY high tunnel door after it has been completed.
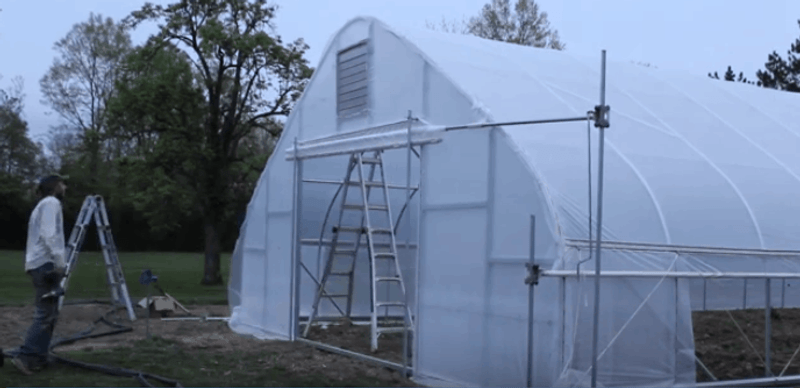
DIY High Tunnel Door Installation Video
While the process outlined in the pictures above take you through a step by step installation process for one of these doors, I would highly encourage you to watch our video on this process as well. The video shows exactly how all of the steps above are completed.
Considerations Before Beginning DIY Door Installation
Now that you have a good understanding of how your large roll-up door can be installed you can now begin mapping out exactly how you will execute the door installation on your structure. Before you take on the build you should plan out all of the materials you will need for the assembly process, and you should also take into consideration that the wider your door is the more support the door header may require through the doors width. For example, if you want to have a 20 ft. wide it is likely best to include an additional stud in the center of your large opening as a support for the header. This additional support will also act as a support against the roll-up bars; as wind pushes the bars inward the middle stud will prevent the bars from bending in the middle of your door in strong winds. It would also be wise to use this middle support as a location for a third anti-billow tube.
While a few of the building materials for this build are a little costly, the door itself will be more inexpensive than any other 14 ft. wide or wider door option on the market. That is to say, if you want a more substantial door than a simple piece of plastic you wire-in-and-out, but you don't want to pay for a super large steel roll-up door, this end-wall opening is a perfect option. Just remember to select the correct output for your gear box (left output or right output).
RELATED POSTS:
- 4 Ways to Attach Greenhouse Plastic to a Metal Frame
- 10 Crucial Hardware Components for Greenhouse Builds
- Best Greenhouse Plastics | Comparing Based on Experience
- How to Install Roll-up Sides on a High Tunnel
- How to Install Top Cover Greenhouse Plastic
- Best Shade Cloth for Tomato Production