
How to Build ANY Greenhouse or High Tunnel in 20 Simple Steps
This blog explains the TVH recommended order of operations for building a greenhouse, hoop house, or high tunnel.
These instructions are not exact for every make or model, but this guideline outlines a universal workflow to help avoid mistakes, wasted labor, and structural issues.
20 Simple Steps to Build Any High Tunnel
1. Plan for your High Tunnel Site
Getting started can be intimidating but most install headaches can be avoided by following these planning guidelines:
- Decide on Greenhouse size and layout.
- Check with your municipality about any permitting laws before purchasing a kit.
- Choose a site that gets sun, drains well, is farily level, and gets protection from extreme winds.
- Read all instructions first if using a DIY kit.
- Gather all materials, tools, and hardware before starting or hiring installers.
- Determine if the structure you are planning for requires electric on site and hire an electrician if needed
Tip:
-
Don’t skip or rush the planning stage; mistakes made during this phase can become expensive fixes later on down the line.
2. Choose and Prep the Site
When you are selecting a site for your High Tunnel it is important to:
- Remove vegetation
- Level the ground
- ALWAYS call Utility Protection Services before digging.
Tip:
-
Be sure to enough leave room around the exterior of the tunnel for maintenance and roll-up sides.
3. Square the Layout
Squaring refers to the measuring and running of strings at your graded high tunnel site which ensures that your structure has a footprint that is a rectangle.
We have a great in depth video on this stage of the process on our YouTube Channel:
Tip:
-
A tunnel that is not square causes additional problems later on in the process with:
- Plastic installation
- Door alignment
- Frame assembly
4. Install Foundation
A high tunnel foundation is made up of the components you will use to anchor your structure into the earth. In most cases, this is achieved by installing Ground Posts. These can be installed 1 of 2 ways, depending on your local permitting requirements or future plans for the structure.
-
- Auger out holes to pour concrete to secure ground posts.
- Pound ground posts into place at a specified height using a post driver.
Tip:
-
It is crucial to install ground posts plumb and at a specified width and depth.
- The tops of the ground posts should all be level.
5. Option to Install Concrete Pad
For those wanting to install a concrete pad, we recommend working with a concrete contractor at this stage to identify the correct sequence of steps for the project.
It is very important to consider the location of sewer lines, water lines, and other utlity lines.
6. Assemble and Attach Hoops
We recommend assembling your hoops on the ground before connecting them to your structure foundation (or Ground Posts).
Hoop Assembly Order of Operations:
- Organize the hardware required
- Assemble the hoops on the ground
- If your structure has truss supports they should be installed to the assembled hoop on the ground
- Once the hoops are fully assembled they can be installed to the ground post foundation
In the case of TVH structures, our hoops slide into ground posts anchors and will stop at a bolt.
For a more in depth look at what this process looks like check out this video from our YouTube Channel:
Tip:
-
It is important to take a step back and make any necessary changes to anything that is twisted, not straight, or slightly out of plumb before moving on to the next steps.
7. Add Corner Wind Bracing
Immediately after installing bows to your high tunnel foundation Corner Wind Braces should be installed. This bracing will dramatically increase structural durability.
Purpose of Corner Wind Bracing:
- Installing bracing at this point in the process ensures that the hiprail and purlins fit correctly.
- These braces are used to plumb endbows, keep them aligned, and add rigidity.A
Check out the Wind Brace kits that we have available here.
8. Install Hiprails
Hiprails run the full length of the structure at hip or chest level. Hiprail channel connects to the hoops wherever they make contact with them.
We recommend using the Double Channel Hiprail that we sell with our structures at TVH. That being said, Hiprails can also be made with locally sourced lumber. A lumber hiprail would run still the full length of the structure, but it would require that you then attach Single Polylock Channel to the lumber for poly securement.
If lumber is inexpensive where you live, this could be a slightly less costly way to install hiprail due to the price difference between single and double channel. However, one thing to keep in mind is that lumber will eventually rot, which is one of the reasons we recommend our Double Channel Hiprail.
For a more in depth look at this part of the process check out this video from our YouTube Channel:
Tip:
-
This is the stage where you make sure every interior bow is plumb or level before moving on to next steps.
-
A level structure will increase its strength and help with things like shedding snow in winter months.
9. Install Baseboards
Baseboards run along the ground down the full length of a high tunnel. They are an important framing component and necessary for any structure with roll-up sides.
At Tunnel Vision Hoops, we recommend using our galvanized steel baseboards or sourcing local lumber.
- Technically you can install baseboard later on in the process but while working on the sides of the structure it makes sense to install baseboard after hiprail.
- If you are using Steel Baseboard (or Hat Purlin Channel) from Tunnel vision Hoops these members will connect at the ground anchor posts with a small overlap at each piece using self tapping 1 inch tek screws.
10. Install Purlins
Purlins are the steel members that run from one end of the structure to the other. In Tunnel Vision Hoops structures, most of our standard kits come with (3) or (5) total purlins.
- Purlins connect to each endbow using Brace Bands.
- Purlins connect at the intersection of each interior bow with Cross Connectors.
- Purlins are installed on top of your hoops.
For a more in depth look at this install process check out this video from our YouTube Channel:
Tip:
-
It is ideal to start at the peak purlin before moving on to installing your side purlins.
11. Install peak braces
These braces are very similar to Corner Wind braces both in form and function in that they provide additional support to the peak of your high tunnel and prevent high winds from shifting the top of the endwalls.
Because peak braces are installed between purlins, it is much easier to install these members after purlins are installed. Purlins will help you determine exactly where the peak braces should go.
For a more in depth look at this part of the process check out this video from our YouTube Channel:
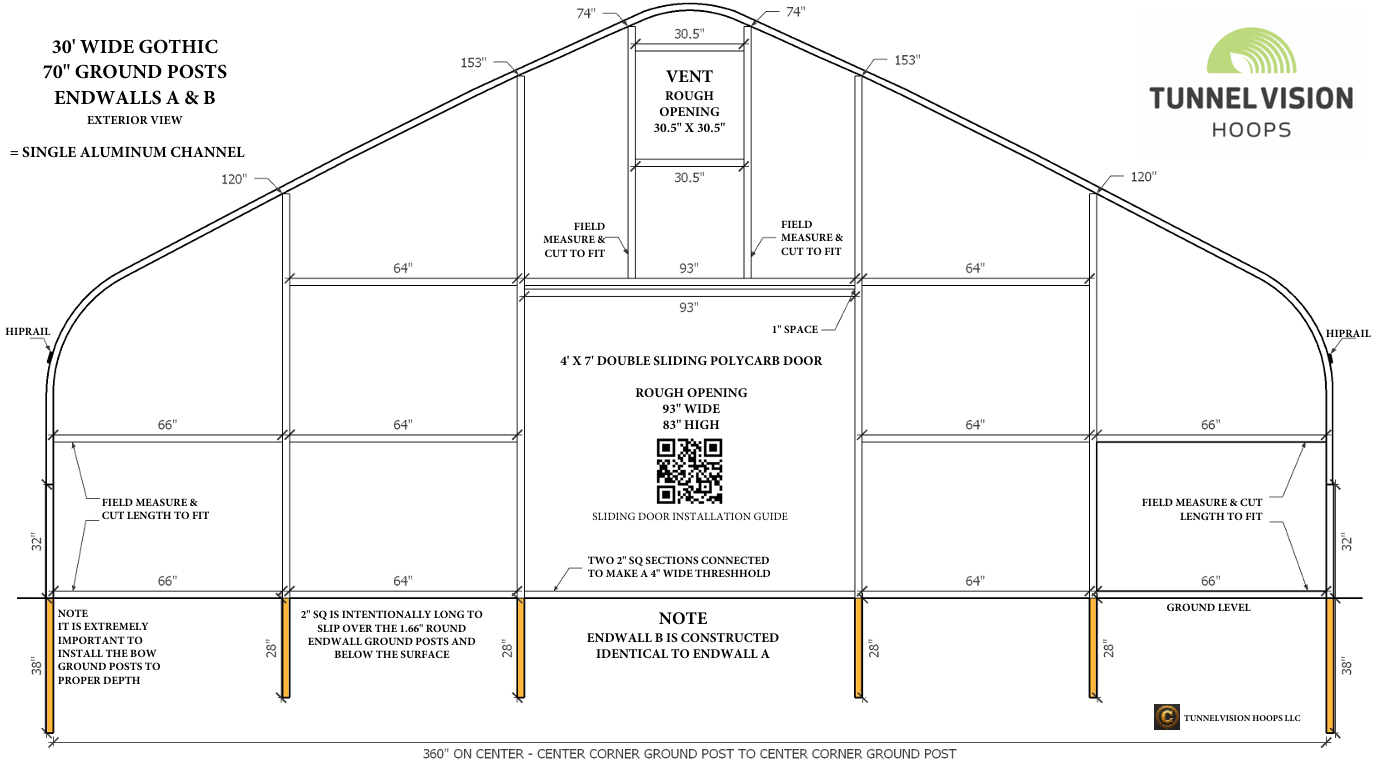
12. Install Endwall framing
This can be a very involved process and it also involves more anchoring. The most important aspect of Endwall framing is slowing down and making sure that your endwall anchors and frame are being installed correctly. Endwalls can be made out of Square Steel Tubing (our recommendation) or they can be made with local lumber.
When framing you must account for the locations of:
Tunnel Vision Hoops DIY High Tunnel Kits include pre-Cut and labeled 2" Square Steel as well as Comprehensive Endwall drawings made to each customer's specifications.
See below for an example Endwall Drawing for our 30 ft. wide Gothic peaked structure:
For a more in depth look at this part of the framing process check out this video from our YouTube Channel:
13. Install Entrances and Vents
Any entrances and vents should be installed AFTER the endwall framing has been completed but BEFORE endwall plastic is installed.
The main reason for this order of operations is that there is no chance of damaging endwall plastic at this stage if it has not been installed yet.
The order of operations for entrances and vents is especially important for anyone installing an exterior mount door, as these often have lips that take up framing space you will not want to lose.
14. Install Polylock / Single Channel
This is the stage where you install single aluminum polylock channel around the face of your endwalls if you are installing 4 year 6mil or woven plastic.
- Frame for single channel around any doors or vents that are installed
-
If you plan to install corner wind panels single channel will also need to be installed at your first interior bow below the hiprail in each corner of the structure
- This single channel will also need to be attached on top of each endbow, AFTER the endwall framing installation is complete.
No Single Polylock Channel is required if you plan to install Polycarbonate Panels at the Endwalls. If you are installing Polycarbonate Twinwall Panel endwalls you would install polycarbonate channel instead.
Twinwall Polycarbonate is a more rigid material than standard endwall plastic and it has a 10-20 year lifespan. Read more about it here on our website.
15. Install Corner Wind Panel Plastic
Corner Wind Panels should be installed if your structure has roll-up sides.
Plastic should always be installed on a calm day without wind.
Corner Wind Panels are located in each corner of your structure and they prevent wind from getting behind your roll-up sides in the shoulder seasons.
-
Use the single channel that was just set up at the first interior bow to install your Corner Wind panels.
-
Secure the Corner Wind Panels in place into the polylock channel using springwire.
- We recommend installing corner wind panels before Endwall Plastic UNLESS you are installing polycarbonate panels in which case corner wind panels should be installed AFTER polycarbonate endwall panels.
16. - Secure Endwall Plastic
At Tunnel Vision Hoops we prefer to provide endwall panels as separate pieces from the top cover because installing plastic as separate pieces allows for a tighter greenhouse plastic installation.
- Use Snap Clamps to temporarily secure the top of your Endwall panel to the top of your end hoop from its peak down to the hip-rail on each side of the structure
-
Then at each side, use spring wire to secure the endwall plastic in place, between the baseboard and hiprail (using the channel you've installed over the top of your endbow).
-
Do not move on to the next step until you are satisfied with the install of both endwall panels
For a more in depth look at this part of the process check out this video from our YouTube Channel:
17. Install the Top Cover
At this stage it is incredibly important to remember that plastic should always be installed on a calm day without wind.
At Tunnel Vision Hoops, we have found that warm plastic stretches better and wrinkles less at install. Take care to keep tension even because uneven tension can shorten the lifespan of the plastic.
We recommend storing your plastic in a location that is approximately 70° F and out of direct sunlight for a few days before you install the top cover.
This is a topic we have covered extensively in some other YouTube videos. Feel free to check out this video for Single Layer Plastic Install instructions:
Or this video for Dual Layer Plastic install instructions:
18. Install Roll-up Sides
In most cases, when we quote our DIY kit structures, we make our roll-up sides out of the same piece of greenhouse plastic that was installed as the top cover. Some folks choose to install (2) pieces of roll-up side plastic separate from the top cover piece that each run from hiprail to baseboard.
Regardless of which method you use to install roll-up sides plastic this stage will require you to:
-
- Assemble a roll-bar
- Connect any manual or automatic operators to your roll-bar
- Attach Greenhouse Plastic to the roll-bar using snap clamps and pan head teks
Be sure to test your roll-bar to be sure it operates smoothly before moving on to installing anti-billow hardware.
19. Install Anti-Billow Rope
Having an "anti-billow" system installed is a crucial aspect of roll-up sides. If you do not have this installed on your structure significant damage could occur to the structure itself or greenhouse plastic in severe winds.
-
Securing the roll bar with anti-billow hardware prevents movement and keeps the roll-bar pressed against the side of your structure
- Installing EZ Snap Hooks at a Steel Baseboard and an Aluminum Hiprail provide rope securement hardware
- Please Note that if you have lumber baseboards or lumber hiprail EZ Snaps will not work.
- Lumber sidewall aspects will require eye bolts instead.
-
Once your attachment hardware is secured rope can run down the length of the structure in a zig zag pattern from one EZ Snap Hook (or Eye Bolt) to the next.
For a more in depth look at this process check out the video from our YouTube channel below:
20. Trim excess Plastic
At this point in the project, we like to take pause to go around and trim any excess plastic on the structure. Be sure to leave a few inches of excess when you trim the following:
- Any endwall or corner wind plastic hanging down in the interior of the structure
- Any of the top cover plastic that extends past the end hoops on the exterior of the structure
Congratulations on a successful build!
If you've followed this general guideline you are more than likely ready to start planting.
However, if you need any material to complete the above steps don't hesitate to contact us by emailing info@tunnelvisionhoops.com.