
5 Ways to Insulate Your Greenhouse or High Tunnel and Protect Crops
Whether building a new greenhouse or high tunnel, or improving an older structure, there are a number of ways to add insulation and improve heat retention.
This post goes into a lot of detail for five of the best methods for insulating your greenhouse, but here is the short list for five of the easiest and most effective ways to insulate greenhouse and high tunnel structures:
- Have two layers of greenhouse plastic and inflate the air space in between with a blower fan
- Use a twin wall hard covering for your end-walls, preferably an 8 mm twin wall polycarbonate
- Put scrap greenhouse plastic over end-wall openings not being used
- Better seal the base of your structure to reduce air transfer
- Use frost blanket as an additional layer of insulation just above the crops
The above provides a quick breakdown on some of the best ways to insulate a greenhouse, but each of the listed methods requires some technical effort to pull off. Below we detail what goes into the insulation methods referred to above, as well as what type of real improvements in heat retention are possible when employing these efforts.
1. Two Layers of Inflated Greenhouse Plastic
This is often the insulation technique with the largest impact for the price.
Simply put, this method for insulation requires two layers of greenhouse plastic, and a small fan that can push a continual flow of air between the two layers of greenhouse plastic.
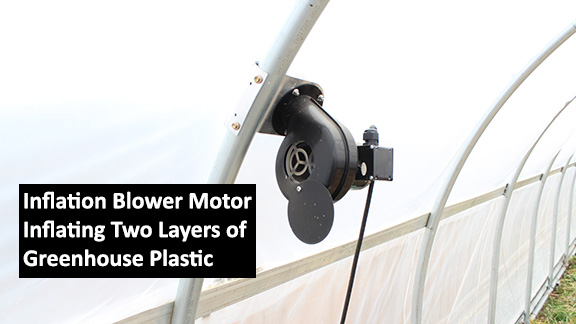
This method of insulation would, of course, require electricity since the inflation blower fan needs to be operating at all times to maintain inflation. While these units can be hardwired into place there are some really great affordable blower fans with cords that can be found here.
If this sounds like a method of insulation that would work for your high tunnel or greenhouse you may want to read this other post that dives deeper into the reasons installing a double layer inflated covering is an awesome option: Why Install a Double Layer Inflation System for your Greenhouse
Here are the PROS and CONS of this type of insulation method:
PROS
Good R-Value per dollar of investment
Relatively easy to install
Has other benefits outside of insulation that make this method attractive
CONS
Costs more than a single layer covering
Requires electricity to power the blower fan
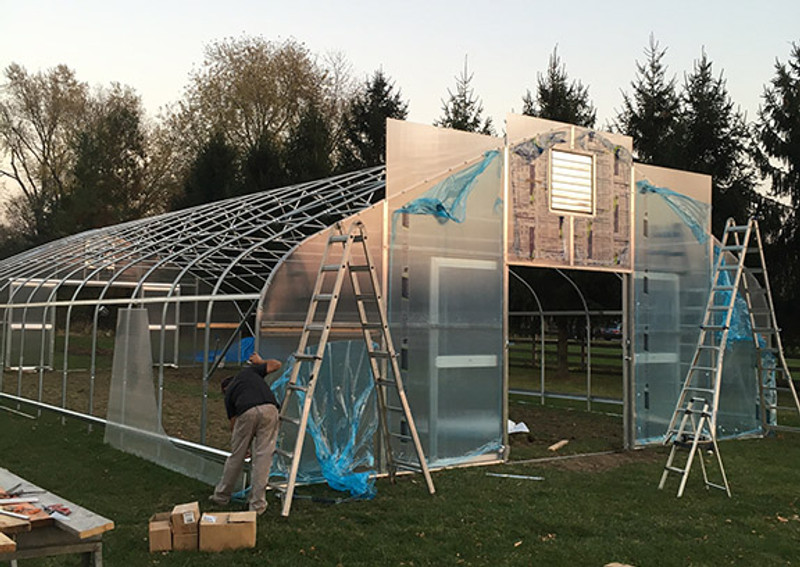
2. Use Twin Wall Hard Covering For Your End-Walls
While there is much more surface area on the top of your greenhouse the end-walls still represent a significant square footage that can be addressed for better insulation.

The simplest structures use 4 year 6 mil greenhouse plastic for their end-wall covering, but as more insulation is desired for an end-wall there is one option that lasts a long time, and adds significant R-value when compared to single layer coverings.
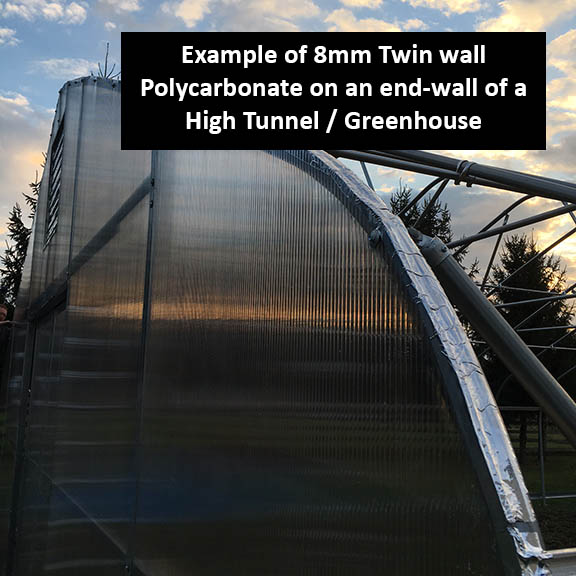
This option is a hard covering known as 8mm Twin Wall Polycarbonate, and this particular covering option is most widely installed with an approximate dead air space between its front and back that is 8 millimeters.
Here are the PROS and CONS of this type of covering:
PROS
Fantastic R-Value for Insulation
Rigid covering does great in wind
Lasts a VERY long time
CONS
More costly up front
More timely to install
3. Cover End-Wall Openings with Scrap Plastic to Seal During the Winter
If you have a structure with entrances and end-wall ventilation it may look like air transfer is closed off when those units are closed, but in all likelihood these components may be a major source of heat loss.
Doors and vents are no different than the doors and windows in our homes in that they are major points of heat loss and air transfer. Even when doors and windows appear to be well sealed there are likely small cracks, or worse yet, the actual component has no insulation properties to help mitigate the cold.
RELATED: 7 Questions to Ask Before Planning Your Greenhouse Build
With the above in mind you may want to consider using scrap greenhouse plastic to cover end-wall features that aren't being used through the winter and that seem to be a big spot of air transfer.
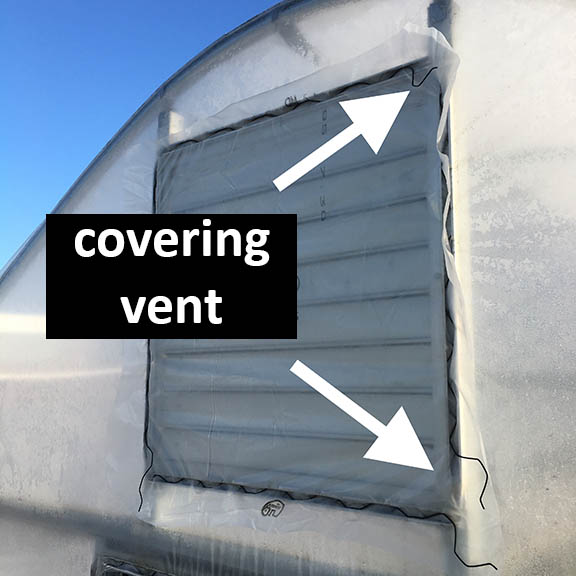
Consider the aluminum shutter placed at the top of your end-wall. Its location provides optimal ventilation during the summer months, but if you take a closer look you will notice that the aluminum shutter is not designed to provide quality insulation.
Sealing Around Shutters and Doors Makes a Difference
Aluminum shutters are thin, and often have cracks where you could visibly look from the inside out of the tunnel or vice versa. These may not be huge cracks, but when compounded with all of the other small cracks and holes surrounding your other shutters, fans, and doors these can be a real drain on the heat retention of your structure.
To get this method for insulating set-up you really just need a few small squares of greenhouse plastic that are slightly larger than the framing for your ventilation component or door. From the outside, simply wire the plastic piece over top of the already installed greenhouse plastic around the framing. No need to remove any wire from the channel as the channel will be able to hold multiple runs of wire and plastic.
RELATED: What is The NRCS High Tunnel Initiative? - Grants For High Tunnels
As mentioned above, doors can also be a point of air transfer. Sliding doors and steel roll-up doors, for example, tend to only be sealed with brushes. These brushes allow the doors to slide or roll freely, but brushes are really not ideal for stopping air transfer...they are after all, just brushes. With this in mind, if you aren't using one of your doors, or don't mind un-wiring a corner of your framing to get in and out there is nothing wrong with covering your door opening with a scrap piece of plastic.
Here are the pros and cons of this type of insulation technique
PROS
- Inexpensive
- It can have a large impact on small air transfer locations
- These aren't difficult to install
CONS
- Might not be ideal if you planned on using your ventilation components in winter
-Might be frustrating if you decided to cover one of the doors you use (which requires wiring and un-wiring to get in)
4. Seal the Base Perimeter of Your Structure to Reduce Air Transfer
It goes without saying that the baseboard / end-wall base of your structure would most ideally be configured in a way where solid contact with the soil is made. With this in mind, I all too often see high tunnels, greenhouses, and hoop houses that have missed this basic step.
It is easy to ignore and dismiss a spot or two surrounding your structures base perimeter as a point you will get to later, but if you see a small air gap just below your structures baseboard, or under one of the bottom horizontal end-wall tubes take a few minutes to back fill with soil to better seal that point on the structure.
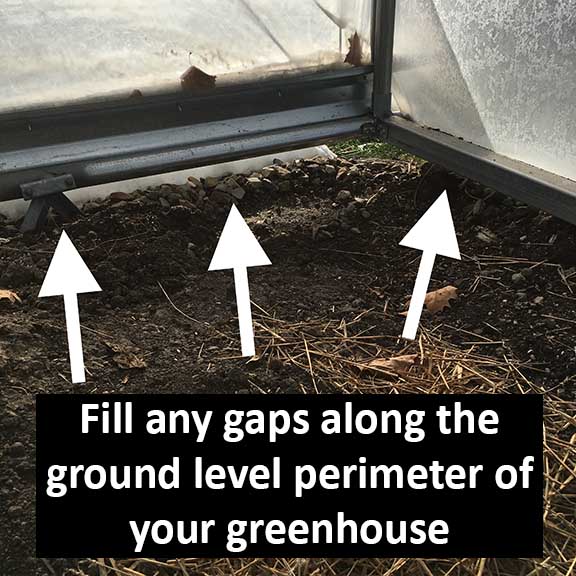
This can be as easy as pushing soil up above the baseboard, base frame, or end-wall horizontal framing.
Here are the pros and cons of this type of insulation technique:
PROS
- It is very easy to address these points of air transfer
- Does not require additional material
- Can be completed very quickly (depending on how much site prep you did before your structure assembly)
CONS
- If your build site wasn't prepared well it could require a lot of ground work to address the air gaps
- If you require a lot of soil to back fill, and don't have equipment, the process could be very labor intensive
5. Use frost blanket as an additional layer of insulation just above crops
This method of insulation isn't necessarily something you will do to your structure, but is instead something you will employ inside your structure.
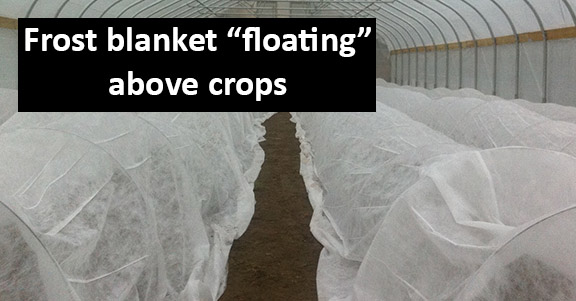
When employing the use of frost blanket above your crops, specifically in the evenings and through the night, it is said to be the equivalent of moving a zone to the south in the sense that frost blanket holds the earths heat close to the crops over night.
There are a variety of frost blanket weights available that can trap heat close to your crops. The lighter the blankets the less insulation value, but the more light transmission. The heavier the blankets the more insulation value, but the less light transmission. If you plan on leaving the blankets on through the day time a lighter blanket might be considered, whereas if you are going to just cover the crops at night a heavier blanket would be best.
Here are four different weights of material you could install over your crops to improve insulation: Frost Blanket / Floating Row Cover Options.
Combining Insulation Methods Provides the Best All Around Insulation
While it is true that any form of insulation is better than no insulation it should also be stated that neglecting one area of insulation can negatively impact all of your other insulation efforts. For this reason it is very important to run through a check list of sorts when it comes to insulation.
If you have gone through the trouble of installing two layers of inflated greenhouse plastic, and 8mm twin wall polycarbonate on your ends, it would make sense to pay extra close attention to the base perimeter of your structure, as well as your door installations to ensure that there aren't large gaps or air transfer locations.
Taking steps to configure your structure for good insulation is fantastic, but only if obvious drains on heat retention are addressed.
With the above in mind, be sure to check the perimeter, around doors and vents, and around roll-up sides. If you do this, and employ some of the techniques outlined in this post you are sure to have a better insulated, and more functional greenhouse or high tunnel.
RELATED POSTS
- 9 Most Profitable Winter High Tunnel Crops
- 3 Best Backyard Greenhouses
- Best Greenhouse Plastic - Comparing Through Experience
- 5 Ways to Make More Money with a High Tunnel
- How to Install Top Cover Greenhouse Plastic
- What is a Hoop House and How Do They Work