
How To Install TWO Layers of Inflated Greenhouse Plastic | Tutorial
Inflated greenhouse plastic is used on greenhouses, high tunnels, and hoop houses as a way to provide additional insulation, deflect wind, and shed snow. In this post, we provide a step by step process for how-to install TWO layers of inflated greenhouse plastic on top of a greenhouse, high tunnel, or hoop house.
We go over the order of operations, how to install a blower motor, how to add a jumper hose, and more.
We have an entire post on the benefits of inflated greenhouse plastic, here, so we won't get much more into that right now... Instead, we're going to focus completely on the how-to aspect of double layer poly.
Materials Needed for Double Layer Inflated Poly Covering
Before we get into the installation process, we should go through the materials needed for installing double layer inflated greenhouse plastic on the top of your structure:
Inflation Blower Motor Fans
Interior Air-Draw Blower Fans (least costly): These are the most commonly purchased inflation blower fans. They come with a mount bracket, are corded, and have an air damper that allows you to regulate the amount of air being taken into the structure. The ones we sell are pretty great, and are available in two different strengths. You can check them out here.
Exterior Air-Draw Blower Fans: These are more costly blower fans, but they pull air from the outside of your structure. The benefit of this is that the inflated space between the layers of plastic will not experience as much condensation, and therefore more light gets through the two layers of plastic. We provide these in two different strengths, as well, and you can view our external air-draw blower fans here.
Greenhouse Plastic
4 year 6 mil IRAD Greenhouse Plastic (cut to order): Most typically installed as the first layer of plastic, as the interior most layer. This plastic has anti-drip properties that reduces interior condensation. This comes in various sizes, which you can view here.
4 year 6 mil UVA Clear Greenhouse Plastic (cut to order): Most typically installed as the second layer of plastic, as the exterior most layer. This plastic is less costly than IRAD plastic. This also comes in various sizes, which can be viewed here.
4 year 6 mil Greenhouse Plastic (ready to ship): Sometimes greenhouse plastic takes a while to cut and ship out, so if you are in a hurry for poly, it could be worth checking pre-cut and ready-to-ship plastic covers.
Poly Attachment Channels
Single Aluminum Channel: This is ideal for attaching the plastic coverings to the structure. If you don't currently use this channel for poly attachment, retrofitting your structure before installing both layers of poly might be a good idea. Check out single channel here.
Double Aluminum Channel: This is ideal for attaching the plastic coverings at the side of the structure. Double Channel is used as a hip-rail, and allows you to avoid using lumber. Here is where you can find the double channel hip-rail.
Jumper Hoses
Jumper Hoses: These are used for moving air from one part of the structure to another. Most typically, these are used to help air move past the peak purlin on gothic style structures. If you have a peaked structure, you can check out Jumper Hoses here.
Steps for Installing Double Layer Poly
The process for installing TWO layers of plastic, and then inflating it, would be nearly the same whether you plan to attach the plastic at the hip-rail or the baseboard. The main difference being determined on whether your structure has roll-up sides or not.
Since most structures DO have roll-up sides, this post focuses on how-to install two layers of inflated plastic just from the hip-rail on one side to the hip-rail on the other side. This is most common when structures have roll-up sides; in other words, the roll-up sides do NOT inflate.
If you do NOT have roll-up sides, no worries, you will follow the same steps but simply attach the plastic to the sides of the structure with spring wire at its baseboard, using spring wire channel.
You can check out our full video on how-to install double layer inflated greenhouse plastic below.
The video above goes into extreme detail, but if you rather get a step-by-step list for the process, read through and check out the pictures below:
1. Set-up the FIRST roll of plastic
Most greenhouse plastic comes on rolls, which makes installing the plastic much simpler. The plastic is folded on these rolls so the plastic can un-fold perfectly when pulled over the CENTER of the structure at one end.
For the above reason, set-up your first roll of plastic at one end of your structure.

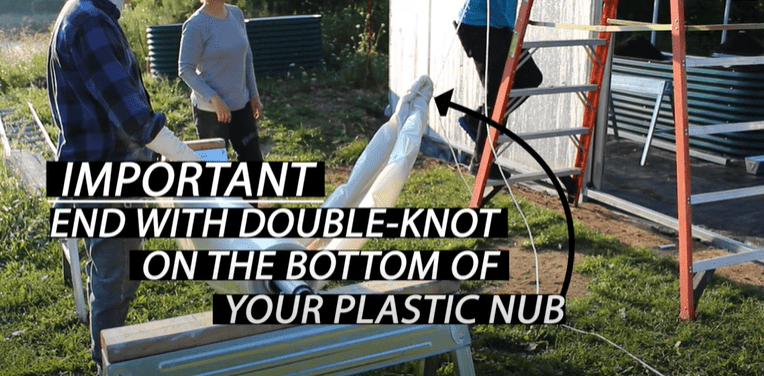
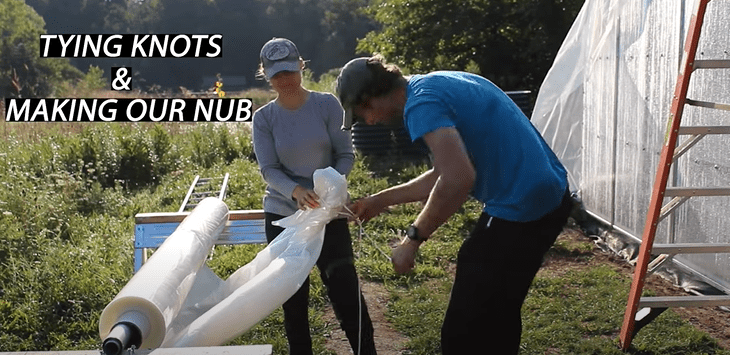
2. Attach Rope to end of plastic cover
Tie rope around the end of your plastic cover so that you've made a "nub" at one end. This rope will be used to pull the plastic the entire length of the structure.
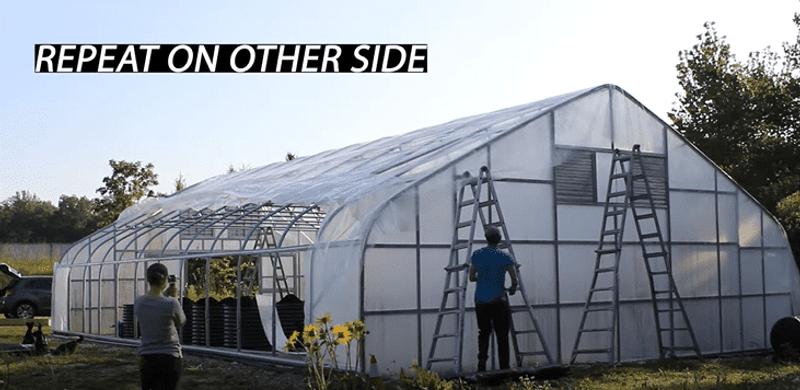
 3. Un-fold the First Layer of Plastic (while it is on your structure)
Carefully unfold one side of the first layer of Top Poly (ideally the side the wind is hitting...remember calm days are best).
Take time to square this side using the fold lines as a guide and remove all wrinkles.
Temporarily secure and hold in place the Top Poly using portions of Spring Wire below the Hiprail on the End Bows. Remember! Do NOT pull the first layer of Top Poly taut, only ensure there are no wrinkles.
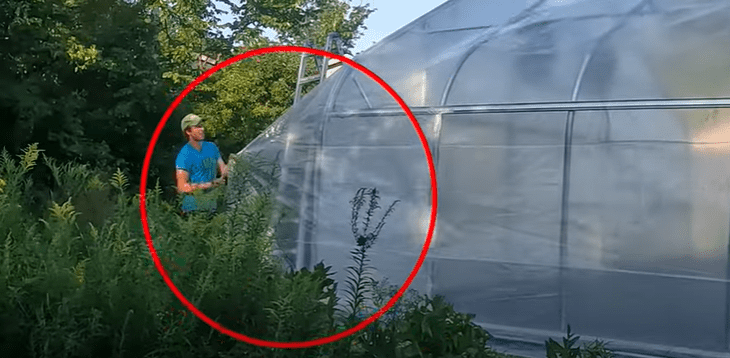
Unfold the other side of the Top Poly and temporarily secure between the Hiprail and Baseboard just like you did on the other side of the structure.
You are now ready to move on to the second layer of plastic... that is correct, you will NOT install any more wire on this first layer of plastic (yes... this requires a calm day).
4. Set-up the SECOND Roll of Greenhouse Plastic
After your first layer has been fastened in place with spring wire, as mentioned above, you can move on to your second roll of plastic.
Using saw-horses and a metal tube, get your second roll of plastic set-up just like before.
Place the roll on your sawhorses using the metal tube, fold its end into a bundle of plastic, and tie the "nub" you've created so you can pull it down from one end of your structure, just like the first.
Make sure to keep the second layer directly on the center purlin, where the folds all meet on the roll of plastic.
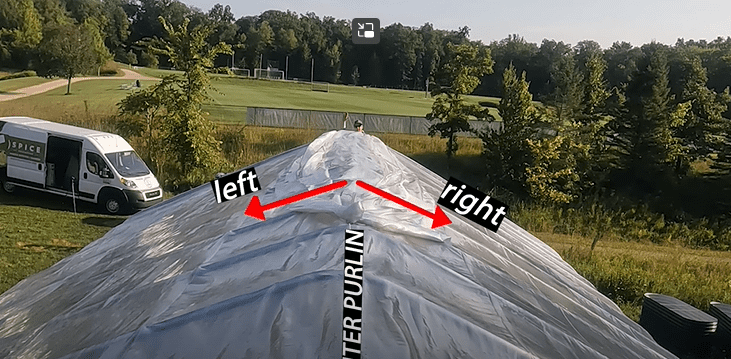
The weight must be evenly distributed to the right and left to avoid this sliding off the first poly layer and causing damage.
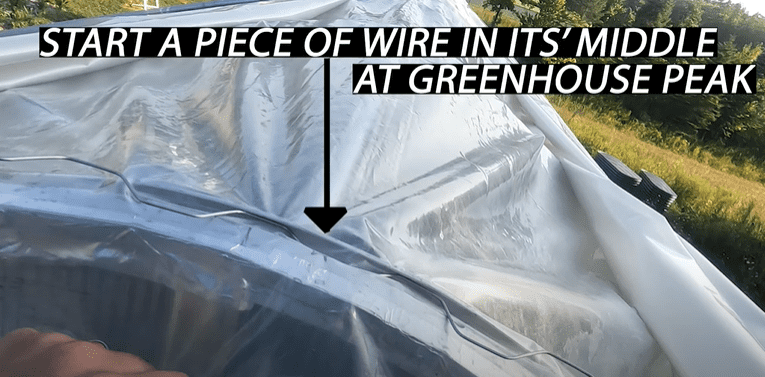
5. Position and Fasten Second Layer of Poly
Ensure once more the center most fold of the second layer is at your peak. Pull only taut enough to remove wrinkles.
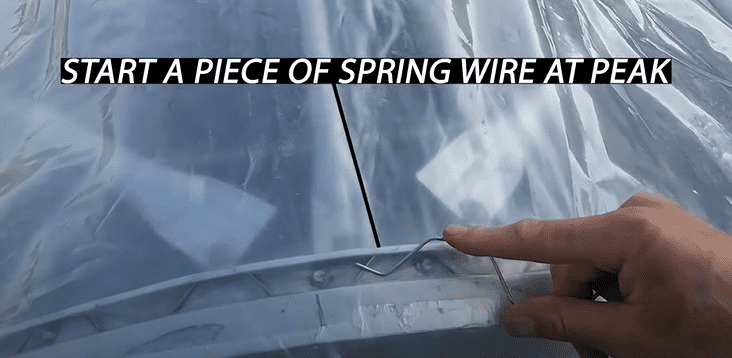
Working in tandem with a person on each end of the structure, begin to install spring wire from the center of each peak down toward a hip-rail.
Then from the center of the peak to the other hip-rail.
Again, make sure the wrinkles are out and the poly is square, but do not pull taut.
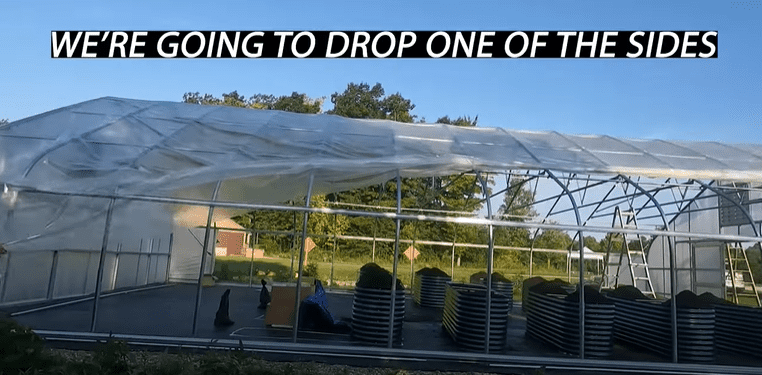
6. Drop The Sides of Your Second Layer Plastic Cover
Carefully unfold one side of the second layer of Top Poly (ideally the side the wind is hitting... if you select a calm day this should be minimal).

Take time to square this side using the fold lines as a guide and remove all wrinkles.
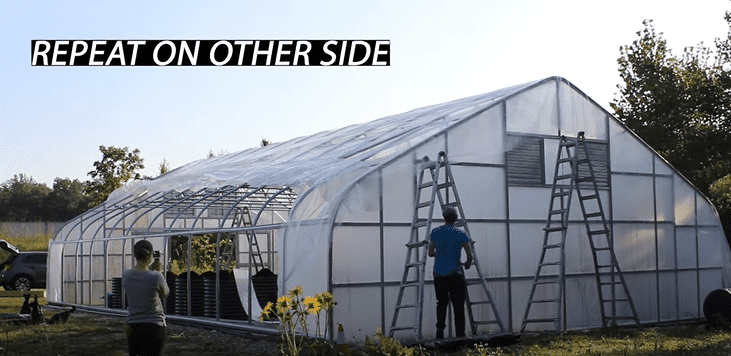
Temporarily secure / hold in place the second layer using a portion of Spring Wire just above the Hiprail on each End Bow.
Repeat this on the other side of the structure.
Double check the first and second layer of poly are square, and adjust if needed.
7. Return to The Peaks and Permanently Secure Wire on Ends
Return to the previously installed wire at the peak and begin where you left off.

Simultaneously secure wire down towards the Hiprail, on both ends of the structure, ensuring all wrinkles are pulled out. Again... YOU ARE NOT PULLING THE PLASTIC TIGHT.
Then repeat on the other side working down from the peak to the opposite Hiprail.
8. Secure Both Layers of Plastic at The Hiprails
Before securing wire along the Hiprail, determine where your Inflation Blower Fan will be located and remember where this will be. You will NOT install wire in the Hiprail (yet) were your blower fan is located.
Instead, leave about 4 ft. (2 ft. to either side of the bow) where your blower fan is to be located.
Installing The Spring Wire in the Hiprails
Start in the TOP Run of your Double Aluminum Channel Hiprail. Do so in the middle of your structure on one side.
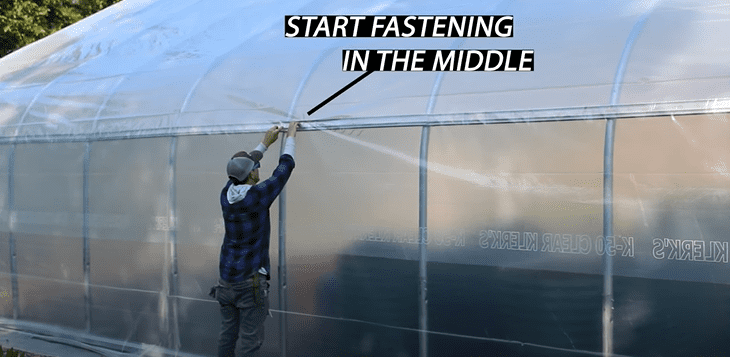
Work in tandem with another person so one of you can move towards the right and one of you can move toward the left. Repeat on the opposite side of the structure, installing spring wire in the Top Run and then Bottom Run of the hip-rail channel.
Remember:
- Do NOT pull the poly taut in the process, only eliminate wrinkles.
- Do NOT put wire (yet) right where your blower fan is going to be located
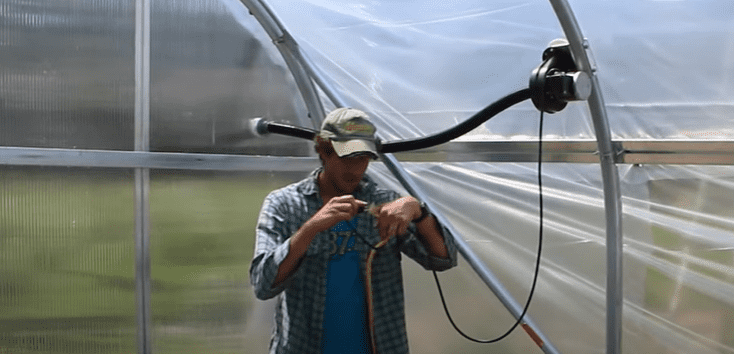
9. Install Blower Fan on Interior of Structure
All inflation blower fans, whether interior air-draw or exterior air-draw, begin at the same point; they are installed using a mount bracket on the inside of the structure.
I like to install these on the first bow in from an end-wall. In other words, on the second bow.
I install blower fans so the bottom of their bracket is about 10-12” above the top of the Hiprail.
Not everywhere sells blower fans with mount brackets and cords, but these blower fans work really well if you want interior air-draw fans, and these blower fans work great if you are looking for exterior air-draw fans.
Determining The Direction of the Blower Fan Mount Bracket
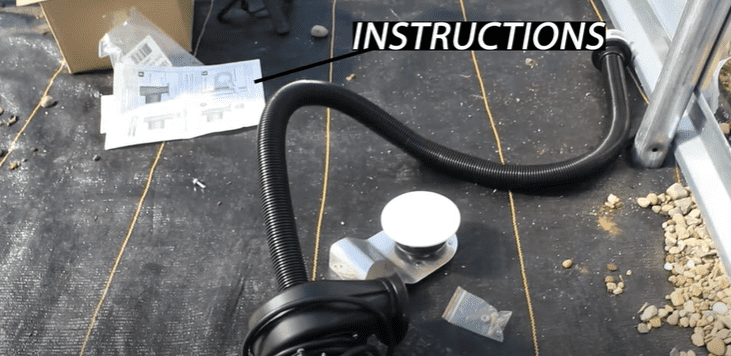
To determine the direction of the mount bracket, check the hole placement on the fan-base and note where your electrical hook-up is located. Line up the pre-drilled holes with the bracket and affix using the provided nuts.
These inflation blower fans are great because their mount brackets have welded bolt locations for the fans... and they line up perfectly. They also come with instructions, so you won't have to rely just on this post for your install instructions.
10. Internal vs External Air-Draw Blower Fans
If INTERNAL Air Draw blower fans are being used, the set up is simple. You will simply attach the fan to the mount bracket installed in the previous step.
Then you just have to adjust the damper as needed. You can then scroll further to skip ahead to the deflector installation instructions.
If Installing an EXTERNAL Air Draw blower fan
External air-draw blower fans are not all that much more complicated than the internal air-draw fans.
There are a couple additional steps though, that vary by how many cubic-feet-per-minute they push out.
Below we outline the process for the external air-draw fans for BOTH the:
- Different CFM capacities offered, and
- The different end-wall plastic material the blower fans will exit for their air
Identify your fan size below and go from there for your installation.
For 148 CFM External Air-Draw Blower Fans on a 6 mil, 9 mil, or 12 mil Poly Endwall
For 148 cfm external air-draw Blower Fans, connecting to a pliable greenhouse plastic end-walls, fully extend the hose that comes with that blower fan so it meets the Endwall.
Use the external air draw bracket to trace a hole where the hose will attach to the Endwall.
Cut the poly along this traced line and attach the screen and bracket on the exterior of the structure, to the hose and bracket on the interior.
The bolts should be pushed through the poly from the exterior to the interior.
You will need another person to assist in tightening the bolts onto the bracket.
For 148 CFM External Air-Draw Blower Fans on Polycarbonate End-Walls
For 148 cfm external air draw Blower Fans being connecting to a polycarbonate end-wall, you'll need to extend the hose from the blower fan up to the polycarbonate end-wall.
Trace a hole the size of the opening of the external air draw hose. Additionally, make a mark for the placement of each of the four bolts.
Using a hole saw, drill the opening for the external air draw tube, and using a small drill bit, drill out where the bolts will be located as well.
Attach the screen and bracket to the exterior of the structure and connect to the hose and bracket on the interior of the structure.
The bolts should be pushed through the polycarbonate from the exterior to the interior.
You will need another person to assist.
For 60 cfm External Air-Draw Blower Fans on 6 mil, 9 mil, or 12 mil Poly Endwall
Fully extend the hose from the blower fan to the Endwall.
Remove the cap, but not the cap-base.
Use the cap-base to trace a hole where the tube will attach to the Endwall.
Cut the poly along this traced line, insert the cap base into the poly. On the exterior attach the cap onto the cap base by twisting until it locks.
For 60 cfm External Air-Draw Blower Fans on Polycarbonate Endwall
Fully extend the external air draw tube from the blower fan to the polycarbonate end-wall.
Remove the cap and cap base, trace a hole the size of the tube.
Using a hole saw, or reciprocating saw, drill (or cut out) the opening for the external air draw tube.
Push the tube through the hole.
On the exterior of the structure, push the cap base onto the tube and twist to lock the cap in place.
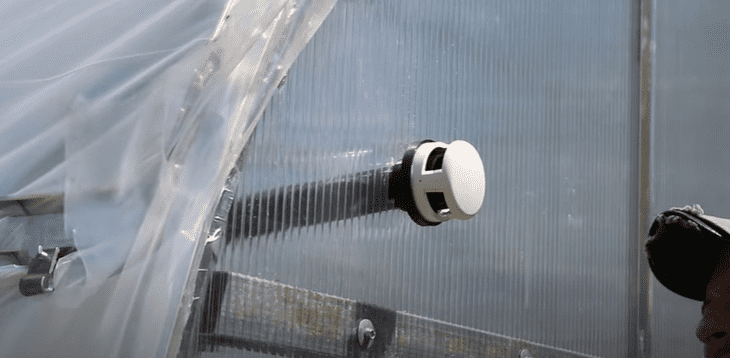
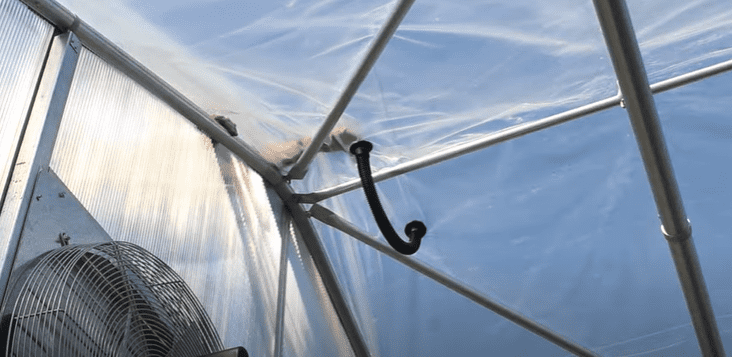
11. Installing the Blower Fan Deflector
The last step of any Blower Fan install is the deflector for the mounting bracket.
Start from the exterior of your structure. Go between the two poly layers where you have yet to install spring wire.

Find the mounting bracket that you already installed on the structures' interior, and cut a hole in the poly slightly smaller than the mount bracket holes' opening.
Line up the deflector with the notches on the mount bracket, push the deflector into the holes, and turn to tighten.
This deflector will create space, allowing the air to flow between the two poly layers.
12. Install Spring Wire in the Hip-Rail at Your Blower Fan
If you remember earlier steps, there will still be some spring wire that needs installed in the hip-rail where you fit your hand in between the layers at the deflector.
Complete the spring wire install in the top and bottom run of the hip-rail where the Blower Fan and blower fan deflector is located.
13. Install a Jumper Hose (Optional)
Once you've installed your blower fan, its' deflector, and wired in the plastic where required on the hip-rail, you might want to install a Jumper Hose.
Jumper Hoses are VERY helpful if you have a peaked / gothic profile structure.
Jumper hoses help move air from one half of your structure to the other, and increase the likelihood that your plastic will be inflated evenly all over your structure.
Jumper Hose Installation Order of Operations
To install a Jumper Hose you will need to return to the peak on the structure exterior, nearest the same end of your structure that the blower fan is located on.
Remove a few feet of wire to the right and left of the peak.
If you are working alone, you will also need to remove a couple feet of wire holding the first layer of plastic in place at the peak. Then, follow these steps (these steps assume you are working alone at this process):
- Twist off the end seals of the Jumper Hose and put to the side.
- Take the Jumper Hose under BOTH layers of poly to the inside of the structure.
- Position the Jumper Hose about 12” in from the end-bow and 6” to 12" to the right and left of the Center Purlin.
- Cut a small hole in the FIRST INTERIOR MOST LAYER ONLY, where one end of the Jumper Hose will be located and expand the hole just enough to push the prongs of the Hose from the interior through the first layer of plastic.
- Install the end cap of the Jumper Hose to its' pronged-end BETWEEN the first and second poly layer and rotate to lock.
- Repeat the previous steps to affix the other end of the Jumper Hose to the other side of the Center Purlin.
- Rewire the two layers of poly at the same time, using only one "run" of wire (where you had just removed it).
14. Trim Excess Greenhouse Plastic
No greenhouse plastic installation is complete without trimming the excess poly.
This is true of two layers of inflated plastic as well.

Trim excess poly at the end-bows and hip-rails, leaving about 3 in. to 6 in. of excess plastic.
Be careful not to damage the Poly or Roll-up Sides in the process.
15. Plug the Inflation Blower Fan In
Plug the inflation Blower Fan into an outlet and allow 1-4 hours for it to fully inflate the two layers of greenhouse plastic installed. This fan should stay inflated 24 hours a day, 7 days a week, and year-round.
RELATED POSTS
- 4 Ways to Attach Greenhouse Plastic to a Metal Frame
- Best Greenhouse Plastic | Comparing Through First Hand Experience
- 9 Highly Profitable Winter High Tunnel Crops
- 5 Ways to Insulate Your Greenhouse
- How to Install Single Layer Greenhouse Plastic
- 7 Questions to Ask Before Planning Your Greenhouse