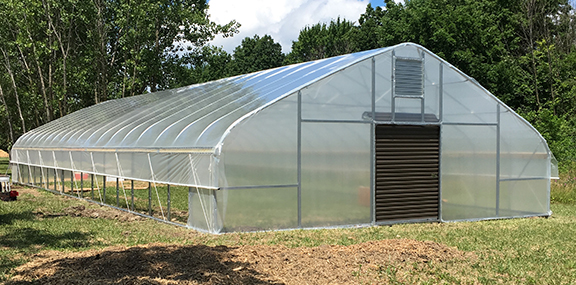
How to Build a Large Hoop House - Material Selection and Configuration

This post explores the necessary considerations when planning to build a large growing structure. More specifically, this post covers:
- Buying a DIY Kit vs Self Fabricating your structure from scratch
- The questions you may want to ask yourself before deciding on the point above
- How you can make the above decisions based on your structure needs
- A list, and the definitions of, components and features found in high tunnels, hoop houses, and greenhouses
If you aren't sure whether you need a high tunnel, or a greenhouse you may want to quickly read through our post High Tunnels vs Greenhouses: Which Structure is Right for me.
While people refer to these structures as Greenhouses, High Tunnels, and Hoop Houses we will commit to referring to them as Hoop Houses for the length of this post.
Most large Hoops Houses follow very similar set-ups with a fairly consistent order of operations;:
- Anchors
- Deciding on hoop diameter
- Deciding on structural supports
All of the above need to be thought through completely before proceeding with a project.
Before you get to the point where you decide on anchoring and hoop size, there are a number of other decisions that must be made that will provide more direction and narrow down the scope of your project.
Lets jump right into the thought process and considerations one should take when starting any project for this type of infrastructure.
How Large is "Large"? | It is a Matter of Opinion
Since "large" means different things to different people it is important for you to first decide what "large" means to you.
For someone that has only been growing under lights in their basement a "large" Hoop House might be 16 ft. wide x 52 ft. long.
That size may seem small to a more experienced grower, such as a small farmer of nursery owner; to these growers a large Hoop House might be closer in size to 30 ft. wide x 120 ft. long.
To figure out how large a structure you are envisioning for your farm it is important to tackle two important questions first since the way you answer the questions might, at least in part, impact how large a structure you want to buy or make.
The Two Biggest Questions you Must Answer
1. Which route do you want to follow for gathering materials and components, a DIY Kit or Self Fabricating a structure?
AND
2. How hands-on do you want to be with this particular project?
Once you come up with answers for these two questions it becomes much more simple to develop project management timelines, and building schedules that can be used to move your project forward.
If you aren't sure how to answer these two questions we do a quick walk through of what you should consider when answering the questions above.
Here is more detail that may help provide you with guidance required to answer the questions above.
DIY Kit vs Self Fabricating: What method for gathering materials and components is right for you?
This question is an important one to answer when trying to determine how to take on building a large Hoop House.
If you planned on purchasing all of your material from a reputable Hoop House manufacturer then you've already figured out a path to a less painful and more guided effort.
For those interested in a DIY Kit, check out our various sizes at our DIY greenhouse kits page. You can also browse HighTunnels.org to get additional information on high tunnel vendors and best practices.
When I say "less painful" I mean that a reputable manufacturer or supplier will do a lot of the legwork for you to make sure all components and structural features necessary are included for your needs from the very beginning.
Essentially, the burden of coming up with a strong, long lasting design (that is easily assembled) is on the manufacturer, and not you.
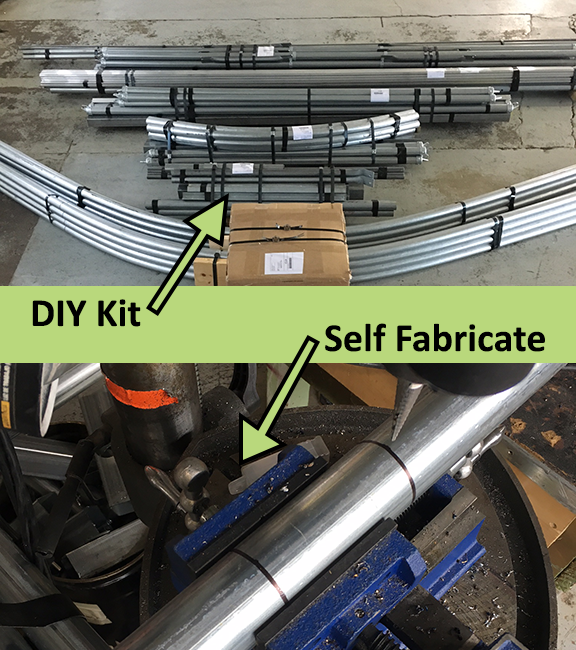
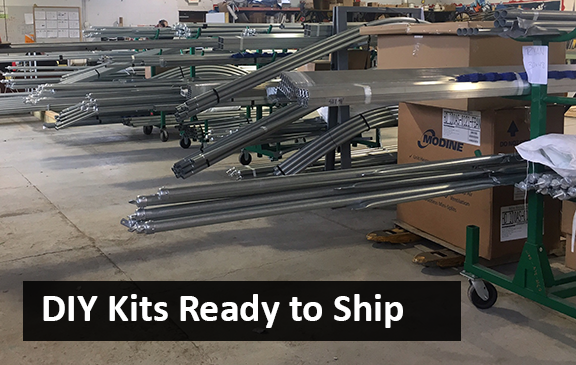
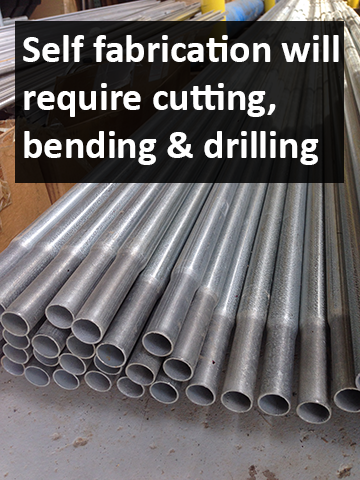
The picture above displays what a DIY Kit frame might look like at the time it is delivered while the bottom half of the picture shows a steel tube having a hole drilled in it, which will undoubtedly be part of the process if you decide to go the route of fabricating your own structure. Below is another picture that shows what DIY Kits may look like when organized by a manufacturer.
Since the structure you are looking for is larger, it will need to have more weather defenses in the form of wind and snow supports.
Since this is what hoop house manufacturing companies like Tunnel Vision Hoops base their reputations on, the responsibility to provide a high-quality structure at a price point that works for your budget is always on their mind(s).
While sourcing a DIY kit from a greenhouse manufacturer or supplier is certainly the easiest way to upgrade to a large structure, it isn't the only route... Some structure designs can be fabricated (by you!) completely from start to finish. I cover this more later on in this post.
...So, which do you want to do: Buy a DIY Kit, or Fabricate from Scratch?
It is important to ask, and answer the question above because if you had planned on purchasing a DIY greenhouse kit your best option would be to stop reading the rest of this post, and begin focusing your efforts on requesting quotes from manufacturers (cough cough...Tunnel Vision Hoops LLC), and then you would be able to follow well composed instructions, and YouTube videos to construct your hoop house.
RELATED: 7 Questions to Ask Before Planning your Greenhouse Build
If you are on the fence as to whether you want to procure a full DIY Kit from a manufacturer, or try to piece part something together on your own, it is important to answer the second question I reference above as to how hands-on you want to be with this process.
I dive deeper into how hands-on things can get below in order to help guide you through how to answer that question.
How hands-on do you want to be with the project?
Determining how hands-on you want to be is one of the earliest decisions one should make when trying to figure out how to approach their large Hoop House project.
If you want to be completely hands off, again, dealing with a manufacturer who can provide a full package DIY kit might be the best option for you.
Additionally, if you were to go the DIY kit route it will be much more hands off during the build portion of the project, as contractors can more easily be hired for the build portion of the greenhouse project because the manufacturer will have supplied plans and installation guidance that the contractor (or you) can follow easily. This makes your efforts nearly completely hands off outside of dealing with your actual property.
If you want to be more hands-on with the project, or have really just desired to go through the process and experience of designing and setting up your larger grow structure with minimal help, there are a number of routes you can take to put together a larger structure.
We will get into these after just one or two additional cautionary disclaimers / reflective questions we are asking you to think through:
If you are someone who wants to "do your own thing"
Proceed with the knowledge that there will be a lot more steps in developing the way your Hoop House structure is comprised
Because your structure will be larger it will be more exposed to wind, snow, sleet and hail.
In other words, its taller profile and larger span will expose it to elements that test its size, and to counter this you will need to plan all aspects of the structure to provide the protection you need, while also providing a selection of materials that can be installed relatively easily; because after all, you will most likely be doing the building of the structure as well.
Here is a brief rundown:
- You will need to decide what diameter steel your hoops will be comprised of.
- You will need to decide whether you need trusses with your structure.
- You will need to figure out how trusses will attach to the hoops, and how long each unit will need to be so it all fits together.
The above is just a random short list of a few of the things you will need to take into consideration BEFORE you can begin procuring the necessary components and materials to make your build happen.
Don't worry too much, this is a doable process, however, I wanted to express here that there certainly are a lot more steps in developing your project when fabricating from scratch.
Taking the time to think out your structure thoroughly will also help once all of your materials are purchased, since you won't have the guidance of an actual instruction manual from a manufacturer...Your pre-planning notes and drawings are your instruction manual when self fabricating.
This isn't necessarily a huge problem since your efforts in the planning stage will help you think through the process of installing the structure, but its worth bringing up since you are considering this large endeavor.
I can't stress enough that this phase of the project is an ideal time to begin sketching out your design, and structure components. These drawings will help you later on in the project, but will also help you grasp some of the technical aspects of your project before you have physical items in your hand.
NOTE: I cover the order of operations for structure development somewhere below, so hopefully that will help streamline some of these steps if this route seems like it is for you.
Now that we have gone through the important pre-project considerations, if you still feel that fabricating your own structure is the route you want to go, the rest of this post is designed to help you cover as many bases as you can to make the planning process, material procurement process, and the installation process as smooth as possible.
... so in a second or two, I will go over what I would perceive as the next steps in building a large Hoop House, but before I do (don't be mad...I have to):...
DISCLAIMER...and other necessary considerations
Please note, that while we cover the order of operations, as well as a number of the specific materials required to put together a larger DIY greenhouse, there are likely size limits to what the average person can successfully design or fabricate and build on their own without the assistance of a reputable manufacture. If you are looking for the type of structure that is 30 ft. wide x 120 ft. long (or similarly daunting) it is strongly advised that you approach reputable manufacturers for structures designed for the elements that stand the test of time.
Now that the disclaimer is out of the way let's talk Hoops
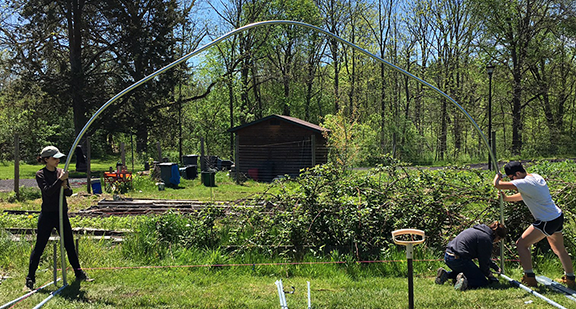
Now that the disclaimer is out of the way lets talk about hoops for those that want to bend their own. Most of the hoop bending apparatuses on the market available for retail users allow for the fabrication of round style hoops.
This may not matter if you don't have a preference on structure profile, and it may not matter if you aren't worried about structural integrity, but this is important to note since round profile Hoop House structures tend to perform a little worse in snow events.
Almost all of the easily available manual bender's on the market today require the person bending the tube to use a lower quality smaller diameter tube in order to make their beds. While this allows many people to fabricate their own hoops it does limit the type of profile that can be fabricated, and it also limits the amount of strength one can provide for a structure since they are limited to specific diameters of tube.
So, in short, if you want a Gothic profile structure or if having a strong greenhouse is a priority for you it could be worth reaching out to work directly with the manufacturer for the hoop components of your structure.
Outside of the hoop profile, and what diameter and gauge of steel the hoops will be, most of the components and features that a large Hoop House is comprised of are straight forward. Snow supports, wind bracing, multiple layers of plastic, attachment hardware, bands and all the rest of it can fairly easily be adapted to whatever type of structure you've decided to go with.
Narrow things down; Quonset vs Gothic / Peaked Structure
Whether you think you want to fabricate all of the hoops on your own with a bender, or do you want to buy a DIY kit with all including materials, one of the first questions you should ask yourself is: what structure profile do I want?
The two primary structure profiles for green houses and high tunnels are:
- Quonset
- Gothic
Quonset structures are rounded structures and Gothic structures have peaked roofs that kind of come to a point like the side profile of a standard house. Below are pictures of each type of profile so you can get a feel for their appearance.
Another thing to consider when selecting what profile of structure you want is to reflect on how you plan on getting your hoops. If you plan on fabricating your own hoops keep in mind that fabricating Quonset / Round hoops is much simpler than self fabricating Gothic hoops; there are a number of products out there available to help novice fabricators bend their own round hoops. These require various levels of dexterity and effort, but they are out there.
With Gothic hoops the bends are possible to fabricate, but making the bends would likely require a larger diameter tube since the bends are sharper in places. I have seen one or two benders out there on the market that allow for a Gothic profile to be bent, however, these benders suggest the use of small diameter tubing, which in my opinion is setting a project up for future disaster, as smaller diameter tube could become too weak where the bends are made.
The above only really need considered if you plan to self fabricate your hoops, as many manufacturers offer Gothic Profile Structures that are easily assembled.
What is the Hoop House's Intended Use
Now that you have decided on either a Quonset or Gothic profile, and have a plan for either fabricating hoops or procuring them, you should take a moment to reflect on the intended use of the Hoop House.
For example, are you planning to heat the structure? Are you going to want to ventilate with roll-up sides as a form of passive air movement? These are just example questions, but depending on how you answer these questions and any others you think of, will do a lot to help you figure out how you need to design and build your structure.
To display what I mean by this I will take the heater scenario I referenced in the paragraph above as an example, and take it a bit further...
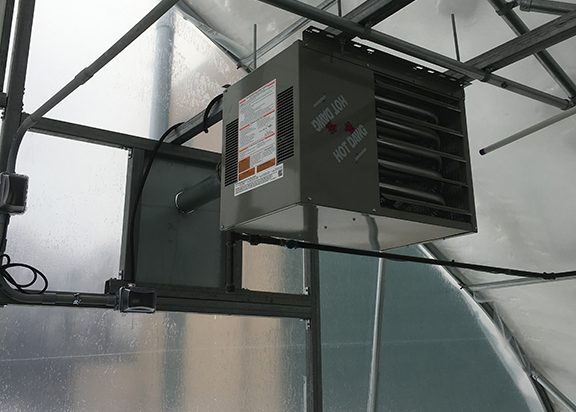
If you want a heater and your primary use of the structure will be to keep warm temperatures in the tunnel, this may lead to other questions that ultimately dictate the design and work that will go into making your structure a reality. For example, you may find your desire to have a heater leads you to more questions:
- How end-walls need to be framed to allow for the heater to exhaust?
- What type of mounting system will the heater require?
- What type of ventilation will be required if I have a heater
- should I secure the plastic all the way to the ground and get rid of the idea of roll-up sides?
- If I secure the plastic directly at ground level on the sides how do I want the plastic to attach to the tunnel?
The list of bullet point questions above are just a few of the questions that popped up when entertaining the idea of a heater. Other questions will pop up like these whenever you begin to reflect on the intended use of your structure. And while more questions may just seem like more work, the questions are all helping guide you to a more specific direction, which will then help guide you more specifically on the design and what materials need purchased. This brings us to what components are needed.
What components are needed for a larger hoop house?
The larger your greenhouse, high tunnel, or hoop house the more components and features will be necessary to ensure that it can withstand inclement weather.
While that is a bit daunting to conceive, there are usually a consistent list of components that you will need to start with no matter the structures size. Working off of this list to get a start on your materials is likely the best path to take.
In order to help you get a jump on your structure I have compiled a list for reference below.
The list I have included has the name (in bold) of each of the primary components your structure will need, a brief description of that particular component, and its purpose within the context of the larger structure. I also provide links to the components I reference when possible.
Below I break down the configuration of a hoop house in the order of operations that I would approach its design and assembly:
High Tunnel Hoop House Order of Operations / Main Components
Anchors / Ground Posts
When developing a hoop house project, start from the ground up. With this in mind, start with the anchors. Not all anchors are ground post style anchors, but one of the easiest anchoring methods to employ out there is the Ground Post Anchoring method, by which a tube is driven into the ground to particular depths, and the portion of the tube remaining above ground is able to meet fit with the hoops attaching to them. Having a tube to drive into the ground is one thing BUT to make sure the hoops all rest consistently within the ground post through the structures full length, it will be important that your ground posts have holes drilled through them where a bolt can be pushed through as a "stop" for the hoops being inserted into the ground posts.
The Hoops, Bows, Arches
I covered hoops in a number of the paragraphs above because, well, depending on what route you take for fabrication and construction, these are going to be some of the most difficult items to produce or source. I won't add too much here other than to say hoops are a primary framing component, and much of the rest of your structure is based off of the type of hoop you're looking to have. For this reason, it is advisable to decide on the profile and strength of your hoops before taking on the other aspects of your design / build.
Again, Gothic profile hoops are often comprised of heavier gauge larger diameter steel, but are going to be very difficult for a novice home DIY-er to fabricate on their own. Round profile, or Quonset, are easier to fabricate for DIY-ers, but they lack strength due to the fact that they are needing to be fabricated out of a lighter gauge smaller diameter tube.
Also, a very important thing to note regarding the hoops is that all of the hardware components and fittings that go along with your structure will be based on the hoops themselves. While there are a ton of different types of tubes and pipes available out there the outer diameters that will allow you to most easily configure your structure(s) will be 1.315" OD Tube, 1.66" OD Tube, and 1.90" OD Tube.
Corner Braces, Wind Braces, Cross Braces
All of the names listed here are different names for the same component, as different people refer to them with different labels. Regardless of what you call them the purpose is to provide wind bracing in each corner of the structure, and it is also to provide a component that will allow the end hoops of your structure to be plumbed during the construction process. Below is a picture of an installed Cross Brace:
These are very important components for both wind stability, and the proper construction of your structure. These braces are typically comprised of galvanized steel tubing, and they often attach to the hoops via nuts bolts and a brace band attachment.
What to Attach to the End of Tubing to Create Cross Braces: Pressed Steel End Cups
What Corner Braces Connect to Hoops With: Brace Bands
Baseboards
Baseboards run the full length of your structure, but they do so at ground level, and on each side of the structure. Baseboards don't need to be comprised of lumber, but they often are, specifically in DIY self fabricated structures. This is where the name for this unit comes from; even when the baseboards aren't comprised of lumber it is often easiest to simply refer to the unit as a "Metal Baseboard" or a "Plastic Lumber Baseboards", or something similar.
Baseboards run the full length of the structure and are connected to each hoop / anchor as they make contact with the hoop or anchor. The primary purpose of the baseboard is to tie together each of these anchors or hoops at the ground level, and also to act as a flat surface for roll-up sides to rest on through the full length of the structure OR if you won't have roll-up sides with your structure the Baseboard provides a surface that greenhouse plastic attachment hardware can easily attach so that Greenhouse Plastic can be secured firmly at ground level.
Hip Rails
Hip Rails run the full length of the structure approximately at waist or hip level (hence the name). Like the Purlins and Baseboards, the Hip Rails will be connected to each hoop as it makes contact with each hoop through the full length of the structure.
Additional Important Information on Hip Rails
Hip rails are also often used to plumb each of the hoops through the full length of the structure, and are what roll-up sides are connected to. Hip Rails are most often comprised of a Double Channel Poly Lock System that is compatible with spring wire OR the Hip Rail can also be comprised of lumber. There are benefits to using the Double Channel Poly Lock System, however, for the following three reasons:
- Double Channel Poly Lock doesn't rot over time in humid conditions like lumber does
- Lumber Hip Rails are much heavier and arguably more difficult and time consuming to install
- After adding the price of the lumber attachment hardware, wood splicers, and two runs of single channel that get installed the full length of the Hip Rail, the price for setting up a lumber Hip Rail correctly is often more expensive than using a Double Channel Poly Lock Hip Rail System.
It is impossible to talk about Hip Rails without talking about how the Greenhouse Plastic will be secured to the tunnel, as this will impact the type of Hip Rail your structure has as a part of it.
I don't recommend wooden batten strips as a way to secure plastic, but I wanted to mention it here because some people do use this attachment method for the greenhouse plastic and this is only doable if your hip rail is comprised of lumber.
As I just noted, we don't advise this method of greenhouse plastic attachment, primarily due to the fact that this form plastic attachment requires permanent holes be made when screwing through it, which makes any potential future readjustments difficult without creating a scenario where holes exist in your plastic.
For the reasons outlined here we recommend using a Double Channel Poly Lock System that can be used with Spring Wire. This will allowed your greenhouse plastic to be secured without damaging the greenhouse plastic, and will also allow you to make any potential adjustments in the future, or add an additional layers of plastic very easily.
Additionally, employing the use of a Double Channel Poly Lock System for your Hip Rail will allow you to more easily install your top cover and roll-up sides as separate pieces of greenhouse plastic (if necessary).
For example, imagine a scenario where one of your farm workers accidentally ripped the top cover of your greenhouse plastic with your skid steer. I know, this sounds like a nightmare. Anyhow, in this scenario the top cover could be cut from the tunnel just above the Hip Rail, and then a narrower piece of Greenhouse Plastic could be purchased to replace the top cover which would save money. This scenario would also save time since the replacement of the top cover would not require un-doing and re-doing the roll-up sides
What to make an all metal Hip Rail out of: Double Channel Poly Lock System
How to add strength to a Double Channel Hip Rail: Two-Hole Straps and Nuts and Bolts
What Hardware is Needed if Attaching Lumber to Hoops: Two-Hole Straps
What Hardware is Needed if Joining Lumber together: 12" Piece of Lumber
What Channel Needs attached to Lumber Hip Rails so Plastic Can be Attached Later On: Single Channel Poly Lock and Spring Wire
Here is a video on the process for installing double channel aluminum hip rails:
Purlins
Purlins are typically comprised of steel, and most often comprised of 1.315" outer diameter tubing, also commonly referred to as top rail or fence rail. The primary function of the Purlin is to disperse wind pressure throughout the full length of the structure.
Additional Information on Purlins
Purlins run the full length of the hoop house, and depending on the width of the structure you are building, you definitely want to have at one Purlin, and possibly want to have as many as seven. Purlins are great for adding rigidity to the entire structure. Regardless of how many Purlins you decide to include with your structure, there should always be a full length Purlin running along the center peak of your structure from one end all the way down to the other end of your building.
What Purlins Attach to Hoops With: Cross Connectors
How The End of Purlins Attach to End Hoops: Brace Bands
Note: In order for your Purlin ends to attach using Brace Bands it requires the ends to be pressed, drilled, and bent so that the hole in the Brace Band lines up with the hole in the end of the Purlin. While this is a difficult process, all of our DIY Kits come standard with Purlins with this type of set-up. You can browse our structure kit offering here if having a pre-assembled kit structure sounds more like your interest.
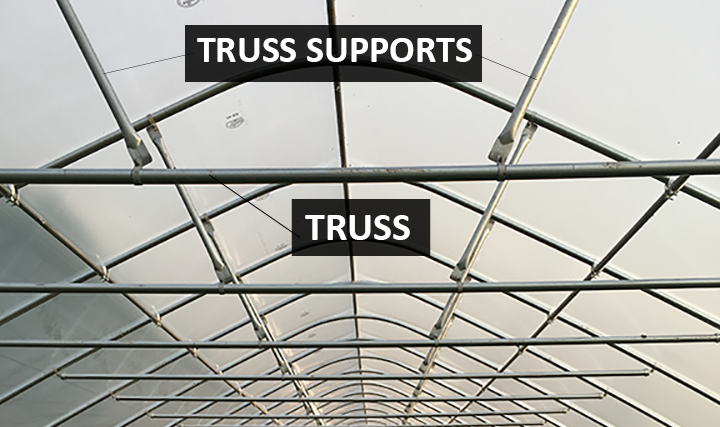
Trusses and Truss Supports
Trusses and Truss Supports are most often comprised of steel, and they span from one side of the structure to the other side of the structure above head level. The intent of these components are to create rigidity within the structure, and they are used as a way to increase the weight bearing capacity of each hoop. This is beneficial for the structures ability to withstand snow loads, and other inclement weather. Some manufacturers refer to these structures under a different name, such as cross-ties, or cross beams or some even refer to them as cross braces (which is a name used most commonly to refer to the braces at each corner). Either way, the picture below should do a good job in showing what exactly a truss and truss support looks like:
Other Notable Truss and Truss Support Information
In addition to being a structural feature on stronger tunnels it is often used as one of the primary components for trellising tomatoes and cucumbers. Cables are run from one end of the tunnel to the other and then strings can be dropped from the cable for trellising crops. For those trying to self fabricate their structures, it is often even more necessary to include these types of components and features, as the steel being used for hoops on self fabricated structures is often of a lower quality than the steel used by manufacturers.
The challenge for home builders that are fabricating their own structures then becomes what material should be used to create their own truss system, and how would that material attach to the hoops themselves. If the plan is to use simple fence tubing that is being sourced from a big box hardware store the answer on how to connect would be End Cups and Brace Bands. These fittings will allow you to cap the ends of your Truss unit and then attach that end of the Truss to a Brace Band that is been pushed over your hoop on each side.
If living in a heavy snow area, or additional structural support is one of your main goals with the structure, it is strongly advisable to consider a professionally manufactured greenhouse or high tunnel that comes with appropriately configured Trusses and Truss supports to help fight the snow in a climate. We take great pride in our appropriately configured structures, and if this describes your situation we hope that you'll consider our DIY kits for your project. If you are committed to taking on your project solo, however, we have you covered with a variety of hardware components that can help you take this task on.
What you need for the end of each Truss: Pressed Steel End Cups
What the Trusses and Truss Supports Attach to Hoops with: Brace Bands
End Wall Framing and End Wall Anchors
End-Wall framing refers to the material used on the front and rear face of your structure. The units used for end-wall framing can be lumber or steel, and these pieces are installed and set-up with the intent to:
- Create rigidity and strength for your end-walls
- Create rough openings for your doors and / or vents
- Give you something to attach your Greenhouse Plastic to
When using lumber to frame your end-wall the main challenge is in figuring out how to secure the framing near ground level of your end-wall. Some people use 4x4 lumber units that are submerged in holes in the ground beneath the end-hoops. These are then concreted in place or back filled with soil, and tamped firmly. From these lumber pieces other lumber is then installed until the complete framing for the structure has been completed. This will include rough door openings, vent openings, horizontal bracing, and ground level framing. Having part of your framing span the width of the structure at ground level is important so you can secure the Greenhouse Plastic to the structure at ground level on each end. If you do not have horizontal framing from one side to the other it is going to be much more difficult to create well secured plastic covered end-wall.
Lumber end-wall framing has the same issues that Lumber Baseboards and Lumber Hip Rails have: Rotting. Over time the lumber will begin to break down and rot due to the humid conditions in the Hoop House. These types of structures are always humid unless ventilated to the maximum and even then it is likely more humid on the structure interior than its exterior. The lumber also will be directly next to your End-Walls' Greenhouse Plastic which means that condensation will likely get trapped between your Greenhouse Plastic and your lumber end-wall framing.
On top of rotting, lumber end-wall framing will 100% without question warp over time. This may not sound like a big deal, but once your doors stop closing and get damaged because of warped lumber the lifetime cost of the lumber may be more than its worth.
With the above being said, lumber is likely the least costly framing method for end-walls, and if you do frame your ends with lumber the best attachment hardware when attaching the lumber to the hoops is 2x4 Bracket Assemblies

When using steel to frame your end-wall the main challenge will be sourcing square steel tubing locally since the lengths of tubing required for your project will often make shipping a cost prohibitive effort (We will ship square steel tube, so if you want a quote you can send us an email here). Anchors for the square steel tubing can be smaller diameter round or square tubing that is driven into the ground much the same way Ground Posts are driven into the ground for your hoops. Once these are driven into the ground (or anchored with concrete) the square tubing can act as a wall stud by sliding over top of the end-wall anchors. You would then have a full length of steel tubing that runs from the ground all the way up to the hoop where it is connected permanently.
I go through the entire process of how one of our end-wall DIY Kits are assembled in a video you can find on our YouTube channel. The video below is a bit longer than the typical video we make, but we felt it was important to outline the step by step process for building end-walls out of square steel tubing.
Steel End-Wall Framing won't warp, should be galvanized so it does not rust, and it will last for a very long time. If you are able to source 2" x 2" Square Steel Tubing for your project it is very easy to connect the framing to your hoop with 2x2 Bracket Assembly for Square Tube
During the end-wall framing portion of your project is when you must consider the type of entrances your High Tunnel Hoop House will have on each end, as well as the type (if any) of end wall ventilation components you will have at each end.
Every door is different, and every door manufacturer has their own set of guidelines for the type of rough opening required for proper installation. This rough opening will guide aspects of how you install your end-wall framing components, as outlined and described in the video above.
Greenhouse Plastic Fastening
Okay, so you have completed all of your framing components, your hoops are up, and all of your weather protection bracing is in place and secured with the appropriate fasteners. It is now time to install the hardware components that will allow you to EASILY attach Greenhouse Plastic to your High Tunnel Hoop House when the time comes.
If you have created your structure out of steel, as this entire post has suggested you should, then you will want to secure your Greenhouse Plastic in one of two ways:
- If you are going to have roll-up sides:
If you are going to have roll-up sides with your structure you should plan your Greenhouse Plastic Fastening System so that part of it includes a Hip Rail that runs the full length of your structure. With this set-up your Greenhouse Plastic will secure along each side of your structure at a height you determine. This height will be where your roll-up sides roll-up to. For example, you may want roll-up sides to open 4 ft. of your sidewall; if this is the case you will install the Hip Rail just above 4 ft. high.
Your Greenhouse Plastic will then secure on the sides at the Hip Rail level. In addition to fastening hardware being required along the side of your structure, you will need to install Single Poly Lock Channel from the ground on one side of the structure all the way over top of your end-hoop to the ground on the other side of your structure. Don't worry, this material conforms to the shape of your hoops.
The greenhouse plastic will not secure permanently beneath the Hip Rail except to the roll-up bar / tube that extends the full length of the structure on each side (I get more into this when I cover ventilation below). If you are going to have roll-up sides I recommend using Double Poly Lock Channel, which is easy to install and provides a rigid component that runs the full length of the structure.
- If you aren't going to have roll-up sides:
If you aren't going to have roll-up sides, the same principle of fastening still applies as outlined above EXCEPT you won't secure the plastic with a Hip Rail along the sides. Instead, the Greenhouse Plastic would secure on the sides at ground level. To secure the plastic to the baseboards, installing Single Poly Lock Channel through the full length your High Tunnel Hoop House, at ground level, is ideal.
In addition to the top cover Greenhouse Plastic, you will need to secure Single Poly Lock Channel on the front face of your End-Walls so that the Greenhouse Plastic can cover the full front and rear face of your tunnel. The channel should be secured around doors, vents, heater exhaust framing, as well as at ground level along the entire bottom front and rear of your High Tunnel Hoop House.
Ventilation
Ventilation is not to be overlooked when designing and building a large High Tunnel Hoop House. When building a large Hoop House you will be creating a structure that has more air volume that can warm on sunny days. Keeping this in mind it will likely also become increasingly difficult to keep temperatures at ideal levels without some form of ventilation. Ventilation is often separated into two types:
Passive Ventilation
Passive ventilation is often the choice of those with limited or no access to electricity where they are building their High Tunnel Hoop House. This method of cooling your greenhouse is exactly as it sounds: Create an opening and passively allow hot air to escape your structure. Among the most effective forms of passive ventilation are roll-up sides, as well as creating an opening near the peak at each end-wall of your structure that will allow the hot air that has risen to escape your High Tunnel Hoop House. If you are planning to make roll-up sides for your structure you will need hardware components for their assembly; here is a quick rundown:
What you will use to attach Greenhouse Plastic to your roll-up sides: Snap Clamps
What you will use to create a very easy roll-up handle: Simple Handles
What you will use to create a slightly better roll-up handle: Universal Joint Handles
What you will need to roll-up sides longer than 72 ft. long: Gear Box Operators
If you want to employ the use of passive ventilation openings you will create in your end-walls there are aluminum shutters that can attach to operators that are affected by the temperature of their surroundings. These actuators are wax tube cylinders, also referred to as Liberty Solar Operators. These attach to specifically configured aluminum shutters and they open and close automatically as temperature threshold are met.
Forced Ventilation
Forced ventilation often is synonymous with electrically operated and thermostatically controlled ventilation. This means that you install hardware components that plug into a thermostat, or can be hard wired to a thermostat. You would then set a temperature at which the ventilation would turn on.
There are endless size options, and applications for forced ventilation components; intake shutters that simply open and close at a certain temperature, fans that actively exhaust air from your structure, as well as interior HAF fans that move the interior air of your structure to keep plants healthy and happy. Here are links to these types of components:
Greenhouse Ventilation Power Intake Shutters: Power Intake Shutters
Greenhouse Ventilation Exhaust Fans: Exhaust Shutter Fans
Greenhouse Ventilation Thermostats: Greenhouse Cooling Thermostats
Greenhouse Ventilation HAF Fans: HAF Fans
Greenhouse Plastic / Greenhouse Poly
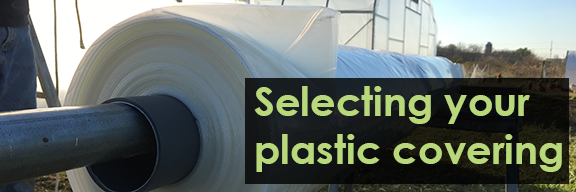
Greenhouse Plastic is one of those topics that involves so much information that it really does deserve a complete blog post dedicated just to that subject. For the purposes of this post, however, we are going to do a light intro of the most popular types of high grade Greenhouse Plastic on the market.
We will also cover what order of operation to follow for the installation of what many consider the most difficult portion of any High Tunnel Hoop House Build.
End-Wall Plastic Covering
Let's think of your structures Greenhouse Plastic as segments, as it is my opinion that the most successful installations of greenhouse plastic are done using separate pieces of plastic for the end-walls and top covers.
For the End-Wall segment of your structure, it is a good idea to use a heavier grade plastic when possible. By this, I simply mean you walk in and out of your end-walls, transport tools near your end-walls, drive tractors near your end walls, and eventually your end-wall is bound to be hit, punctured or lightly dinged up.
If it works for your budget, woven end-wall plastics, also referred to as "polyweave" plastics work very well on the end-walls of greenhouse structures. These range in thickness from 7 to 12 mil, and can be installed with Single Poly Lock Channel and Spring Wire. If it doesn't fit into your budget, a 4 Year 6 mil Clear Greenhouse Plastic will also work very well when installed as an end-wall covering. Here is a list of the most popular End-Wall Plastic Coverings:
4 Year 6 Mil Clear Greenhouse Plastic: Here
4 Year 6 Mil IRAD Greenhouse Plastic: Here
9 mil Woven Greenhouse Plastic: Here
12 mil Woven Greenhouse Plastic: Here
If you are interested in the way recommended installation method for End-Wall Plastic here is a detailed video that takes you through the step by step process of installing an end-wall plastic covering:
Top Cover Greenhouse Plastic
Top cover greenhouse plastic should be installed following the installation of your end-wall plastic covering, and while there are a variety of greenhouse plastics for top covers there are only a few that can be listed among the most popular covers out there. Keep in mind, as I stated earlier, that there are a TON of options for greenhouse plastic, and I do intent to have a separate completely dedicated blog post for this as soon as possible, however, for the purposes of this post I will mention my three favorite coverings for the top cover of your your High Tunnel Hoop House:
Two Layers of Plastic with an Inflated Dead Air Space in-between
Yes, I realize this isn't an easy "type" of plastic, but the benefits of a double layer greenhouse plastic system cannot be ignored, and the incremental additional cost is fairly low compared to the potential benefits. I cover the benefits more in a full blog post that can be found here, but for now I will simply say that if you do a double layer system you will need the following:
- Anti-Drip Plastic for your interior layer (graded for 4 years) that will cover from the ground on one side to the ground on the other side
- UVA Clear Plastic for your exterior layer (graded for 4 years) that will cover either from ground to ground (if you do not have roll-up sides), and from Hip Rail to Hip Rail if you do have roll-up sides.
- An Inflation Blower Motor in order to push air between the two layers of plastic. This will require that you have electricity capabilities on-site though.
- A Jumper Hose (Optional) can help move air from one half of your tunnel to the other half of the tunnel in scenarios where you have fabricated a Gothic profile structure.
A Single Layer of 4 Year 6 mil Anti Drip IRAD Greenhouse Plastic
Yes, Anti-Drip plastic is most effective when installed as a part of a double layer greenhouse plastic system, HOWEVER, most anti-drip IRAD Greenhouse Plastics have a higher thermicity rating, which corresponds to a slightly better ability to hold warm temperatures within the High Tunnel Hoop House structure. You can find this plastic here
A Single Layer of 4 Year 6 mil Clear Greenhouse Plastic
Clear Greenhouse Plastic is considered the biggest "bang for your buck" greenhouse glazing material. It is less costly than plastics with all kinds of creative additives in it, and it is still durable with a 4 year stamp of approval, which means that it will last 4 years if installed correctly. You can find this plastic here.
A Single Layer of 5 Year 10 mil Clear Greenhouse Plastic
A little more costly than 6 mil coverings, a 10 mil Clear Greenhouse Plastic appears as a sealed woven type of material. When I say woven I simply mean that the material has a slight texture to it. That said, the woven greenhouse plastics typically have higher break points, and can withstand more weight. The light transmission is a bit lower on these, but the diffused light percentages are a bit higher so it does a good job of spreading the light once it passes through the plastic. You can find this plastic here.
Once all of your greenhouse plastic has been selected you will need to install the material on your structure. Here is a short video walking you through a method two people can use to install the top cover without using heavy machinery.
Are you Ready?
That is a run through on "how to build a large hoop house"...one of the most frequent questions I get from farmers and back yard gardeners. Hopefully after reading, and referencing this post you feel a bit more at ease about assembling your High Tunnel Hoop House. Or if anything, hopefully it has you excited about purchasing your very first DIY Greenhouse Kit.
Need help figuring out what type of hardware you need? Need help selecting a DIY Kit? Don't hesitate to send us a message through our Contact Us page; we would love to help you.
RELATED POSTS:
- 10 Crucial Hardware Components for Greenhouse Builds
- Can 6 mil Contractor Plastic Be Used as a Greenhouse Cover?
- 3 Best Backyard DIY Greenhouse High Tunnel Kits
- How to Install Greenhouse Plastic Top Cover | Order of Operations
- Best Shade Cloth for Tomato Production
- 9 Most Profitable Winter Crops to Grow in a High Tunnel